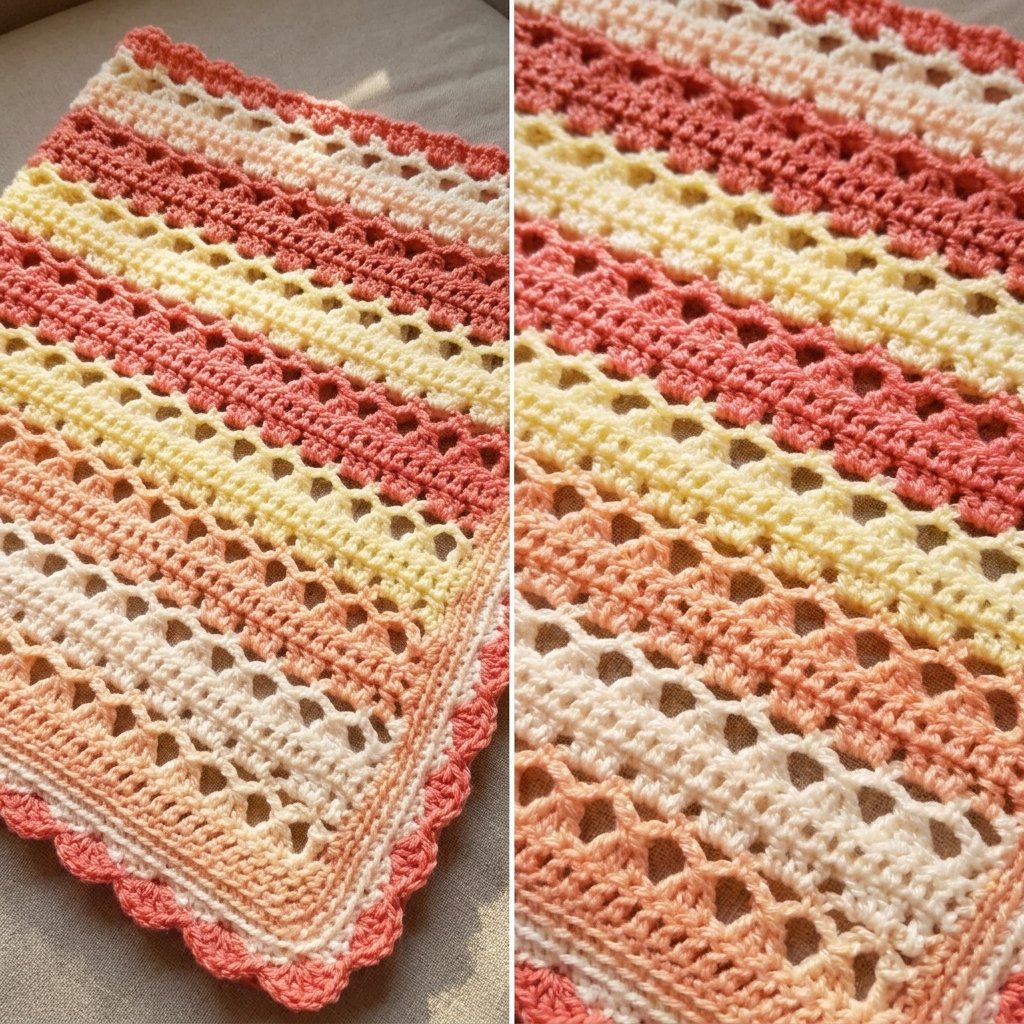
If you are looking for a gentle, rhythmic stitch pattern that produces soft drape and charming visual texture, this crochet baby blanket design is one of my absolute favourites. By combining solid double crochet foundation rows with delicate three-stitch cluster arches, it creates an open, breathable fabric that keeps little ones warm without feeling heavy. It works up quickly, looks stunning in alternating pastel stripes, and is easy to customise to any custom blanket width. Below you will find the complete written pattern, sizing calculations, stitch guides, and video tutorial.
Although openwork lace can sometimes look intimidating to newcomers, the rhythm of this pattern repeats across just three core rows. Once you master the foundation row and the two-row lace arch sequence, you can crochet along smoothly while watching your favourite television series. Grab your hook, select your softest baby yarns, and let us work through this lovely blanket pattern together.
Table of Contents
What Will I Learn?
Following this tutorial step by step will guide you through several versatile crochet skills:
- Calculating a custom foundation chain using the 3 + 1 stitch multiple rule
- Crocheting three double crochet clusters across separate stitches to form open triangular windows
- Building open chain-5 arch netting to balance stitch tension
- Working double crochet groups directly into open chain spaces to restore a solid row
- Making clean, invisible color transitions between alternating color stripes
- Adding an optional scalloped border around the perimeter of your blanket
Materials and Tools
Here is the exact list of supplies I used to create the sample swatch and blanket:
- Yarn: Light DK or Sport weight acrylic baby yarn (approximately 100 grams / 350 meters per skein). In the tutorial, I used 100% acrylic baby yarn in pastel sky blue and crisp white. For a full baby blanket measuring 75 cm by 75 cm (29.5 by 29.5 inches), you will need approximately 300 to 400 grams (3 to 4 skeins total).
- Crochet Hook: 3.0 mm crochet hook (US size C-2 or D-3), or the hook size needed to obtain your desired fabric drape.
- Tapestry Needle: For weaving in yarn tails between color stripes.
- Scissors
- Tape Measure: To check your foundation chain length.
Please note on yarn selection: Baby blankets require frequent washing, so I recommend choosing an acrylic, cotton-acrylic blend, or superwash wool yarn that is soft against delicate skin and machine washable. If you decide to substitute yarn weights, a light worsted or standard DK yarn paired with a 3.5 mm or 4.0 mm hook will also produce a wonderfully squishy texture.
Sizing and Stitch Multiples
This stitch pattern is worked over a stitch multiple of 3 + 1, plus 3 turning chains.
Here is how the stitch count works out:
- Stitch Multiple: Any multiple of 3 (such as 18, 21, 24, 60, 90, 120, or 144).
- Plus 1: Add 1 base chain to balance the symmetry of the pattern repeat.
- Plus 3: Add 3 extra chains to serve as the turning chain (this counts as your first double crochet of Row 1).
- Sample Swatch Calculation:
- (3 x 6) = 18 chains
- 18 + 1 = 19 base chains
- 19 + 3 turning chains = 22 chains total
- Working into the 4th chain from the hook yields 20 stitches across (1 turning chain-3 plus 19 double crochets).
Project Sizing Chart
- Practice Swatch (approx 4.5 inches wide): Chain 22 (20 stitches across).
- Standard Baby Blanket (approx 75 cm x 75 cm / 29.5 x 29.5 inches): Chain 148 (48 pattern repeats of 3 = 144 + 1 + 3 turning chains = 146 stitches across), or simply chain until your un-stretched foundation chain reaches 75 centimeters (29.5 inches), ensuring your total chain count ends on a multiple of 3 plus 4 chains.
- Large Receiving Blanket (approx 90 cm x 90 cm / 35 x 35 inches): Chain 178 (58 pattern repeats of 3 = 174 + 1 + 3 turning chains = 176 stitches across).
- Toddler / Crib Throw (approx 100 cm x 125 cm / 40 x 50 inches): Chain 196 (64 pattern repeats of 3 = 192 + 1 + 3 turning chains = 194 stitches across).
Pattern Notes and Abbreviations
- Crochet Terms: Standard US crochet terminology.
- Turning Chain: Chain 3 at the beginning of double crochet rows always counts as the first double crochet of the row.
- Stacked Double Crochet Option: To keep the side edges extra neat and avoid small gaps, you can replace the initial chain-3 with a stacked single crochet (work 1 single crochet in the first stitch, then work 1 single crochet directly into the left vertical bar of that first stitch).
- Stripe Structure: Each color stripe consists of 3 rows (Row 1 solid base, Row 2 cluster windows, Row 3 chain arches). The new color is introduced at the start of Row 4 (the recovery row).
Abbreviations
- ch: chain
- sc: single crochet
- dc: double crochet
- st(s): stitch(es)
- ch-sp: chain space
- dc3tog: double crochet 3 together (3-dc cluster)
- dc2tog: double crochet 2 together (2-dc edge cluster)
- sl st: slip stitch
- yo: yarn over
Special Stitches
3 Double Crochet Cluster (dc3tog over 3 consecutive stitches)
This stitch creates the pointed triangular peaks in Row 2:
- Yarn over, insert hook into the first indicated stitch, yarn over, and pull up a loop (3 loops on hook).
- Yarn over and draw through the first 2 loops (2 loops remain on hook).
- Yarn over, insert hook into the second indicated stitch, yarn over, and pull up a loop (4 loops on hook).
- Yarn over and draw through the first 2 loops (3 loops remain on hook).
- Yarn over, insert hook into the third indicated stitch, yarn over, and pull up a loop (5 loops on hook).
- Yarn over and draw through the first 2 loops (4 loops remain on hook).
- Yarn over and draw through all 4 loops on the hook to close the cluster.
2 Double Crochet Cluster (dc2tog over 2 consecutive stitches)
Used at the end of Row 2 to balance the edge:
- Yarn over, insert hook into the next stitch, yarn over, pull up a loop, yarn over, and draw through 2 loops (2 loops on hook).
- Yarn over, insert hook into the final stitch (top of turning chain), yarn over, pull up a loop, yarn over, and draw through 2 loops (3 loops on hook).
- Yarn over and draw through all 3 loops on the hook.
The Written Pattern
Foundation Chain
Using Color A (Sky Blue) and a 3.0 mm hook, chain 22 for the practice swatch (or chain any multiple of 3 + 1, plus 3 turning chains for your desired blanket width).
Row 1: Solid Double Crochet Foundation Row
- Work 1 dc into the 4th chain from your hook (the 3 skipped chains count as your first dc).
- Work 1 dc into each chain across the foundation chain to the end.
- Turn your work.
- (Stitch count: 20 stitches on swatch; 1 turning chain-3 plus 19 dc).
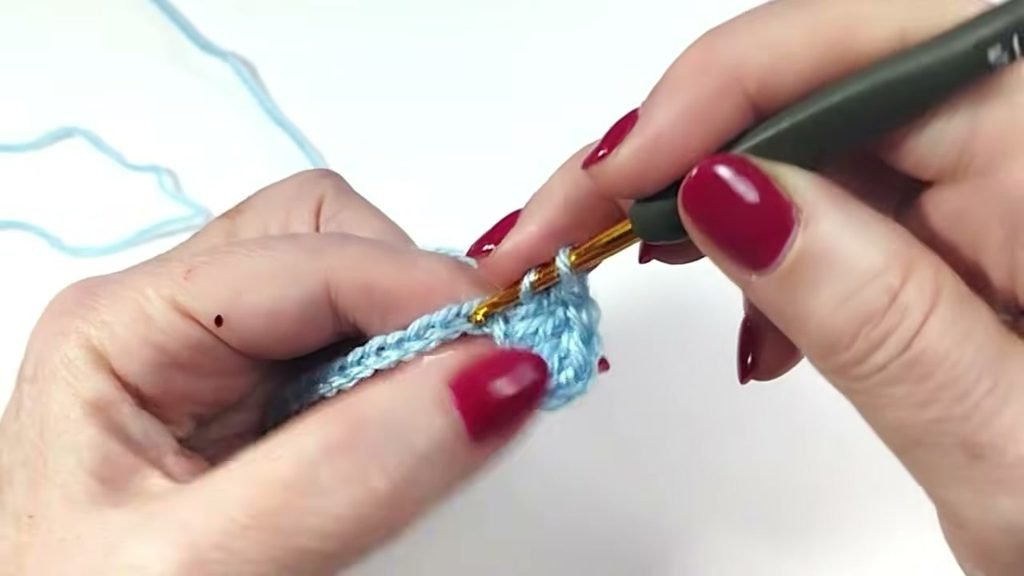
Row 2: Cluster Windows and Chain Spaces
- Ch 1, work 1 sc into the very first stitch, then work 1 sc into the vertical loop of that sc (counts as 1 dc, or ch 3).
- Ch 5.
- *Skip the next 2 stitches, work a 3 dc cluster (dc3tog) across the next 3 stitches, ch 5*; repeat from * across until exactly 2 stitches remain in the row.
- Finish the row by working a 2 dc cluster (dc2tog) across the last 2 stitches (the final leg goes into the top of the turning chain-3).
- Turn your work.
- (On the swatch: 1 initial dc, five ch-5 loops, four 3-dc clusters, and 1 ending 2-dc cluster).
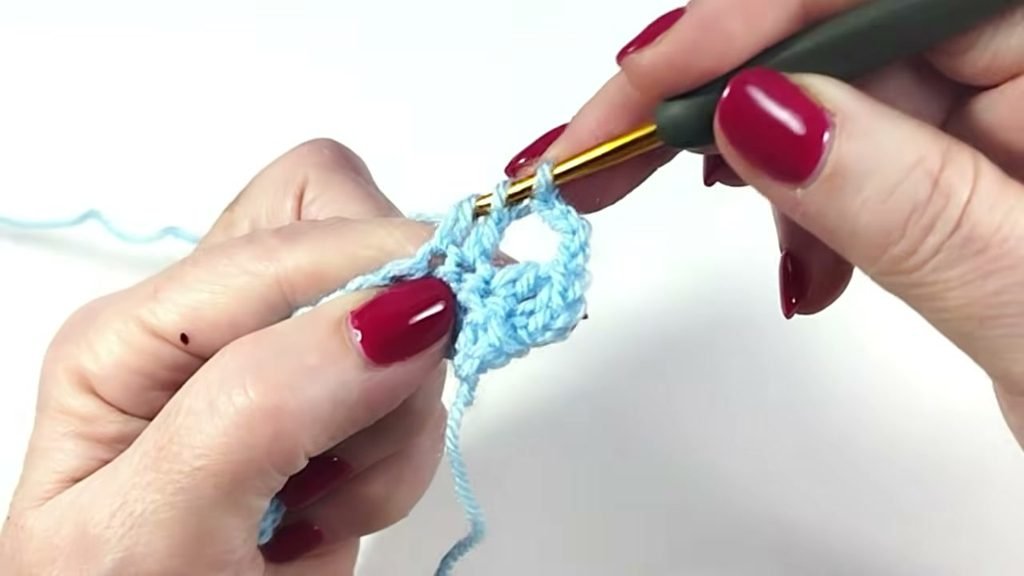
Row 3: Chain-5 Arch Mesh
- Ch 6 (this counts as 1 dc plus a ch-3 corner space).
- Work 1 sc into the center of the first ch-5 space.
- *Ch 5, work 1 sc into the next ch-5 space*; repeat from * across to the final ch-5 space.
- Finish the row with ch 3, then work 1 dc into the top of the ending cluster stitch from Row 2.
- Cut Color A, fasten off, and turn your work.
- (On the swatch: 1 starting dc + ch 3, four full ch-5 arch loops, 1 ending ch-3 + dc).
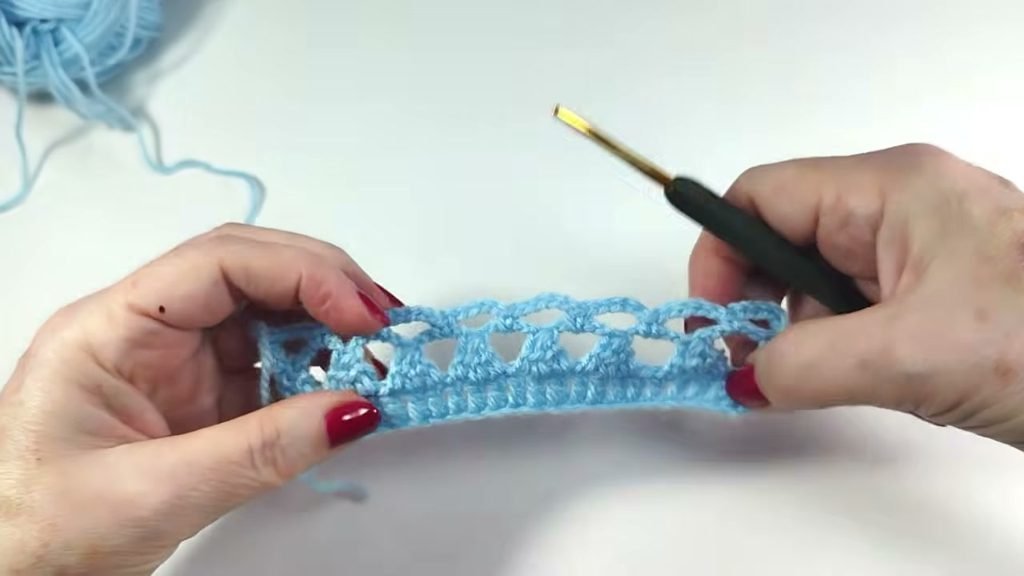
Row 4: Double Crochet Recovery Row (Color Change)
- Join Color B (White) with a slip stitch into the very first dc stitch.
- Ch 1, work 1 sc into the first stitch, then 1 sc into the vertical bar (counts as your first dc, or ch 3).
- *Work 3 dc directly into the next open ch-5 space*; repeat from * across every open ch-5 loop across the row.
- Into the final turning chain space (the ch-3 space from Row 3), work 3 dc.
- Finish the row by working 1 dc into the 3rd chain of the turning chain.
- Turn your work.
- (Stitch count: exactly 20 double crochets, perfectly restoring your solid stitch count).
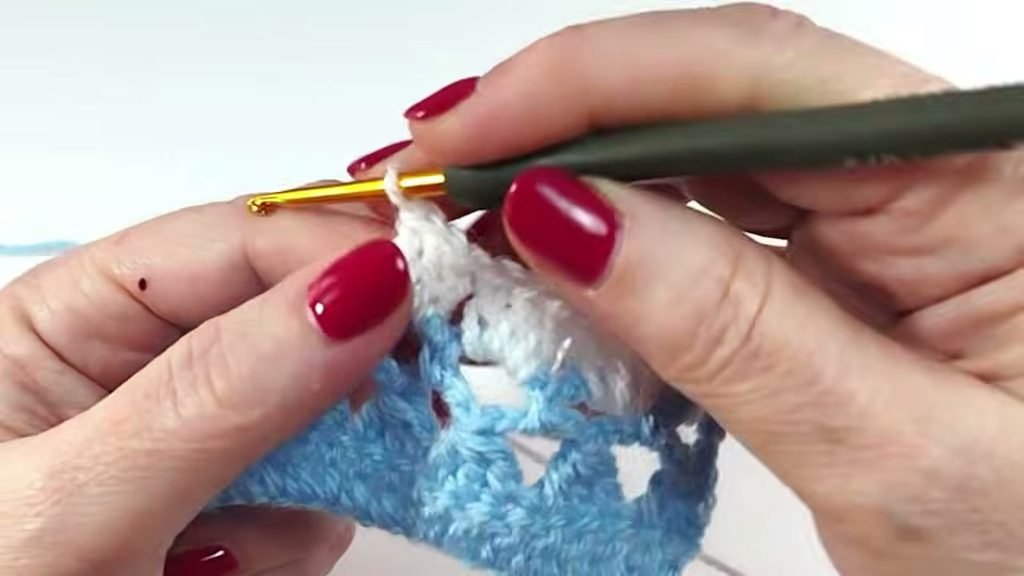
Row 5: Repeating Row 2 in Color B
- Ch 1, work stacked sc in the first stitch (or ch 3, counts as 1 dc).
- Ch 5.
- *Skip the next 2 stitches, work a 3 dc cluster (dc3tog) across the next 3 stitches, ch 5*; repeat from * across until 2 stitches remain.
- Work a 2 dc cluster (dc2tog) across the last 2 stitches.
- Turn your work.
Row 6: Repeating Row 3 in Color B
- Ch 6 (counts as 1 dc plus ch 3).
- Work 1 sc into the first ch-5 space.
- *Ch 5, work 1 sc into the next ch-5 space*; repeat from * across to the end.
- Finish the row with ch 3, then work 1 dc into the top of the ending cluster.
- Cut Color B, fasten off, and turn your work.
Rows 7 and Beyond: Continuing the Blanket Body
- Join Color A (or your next contrast shade) into the first stitch.
- Repeat Rows 4 to 6 for each color stripe, changing colors after every 3-row stripe.
- Continue working your 3-row color blocks until your blanket reaches approximately 73 cm (28.7 inches), or 2 cm short of your final desired length.
- Final Row: To give the blanket a clean, balanced top edge that mirrors the foundation row, work one final repeat of Row 4 in your chosen border color. Do not fasten off if you plan to add the scalloped border.
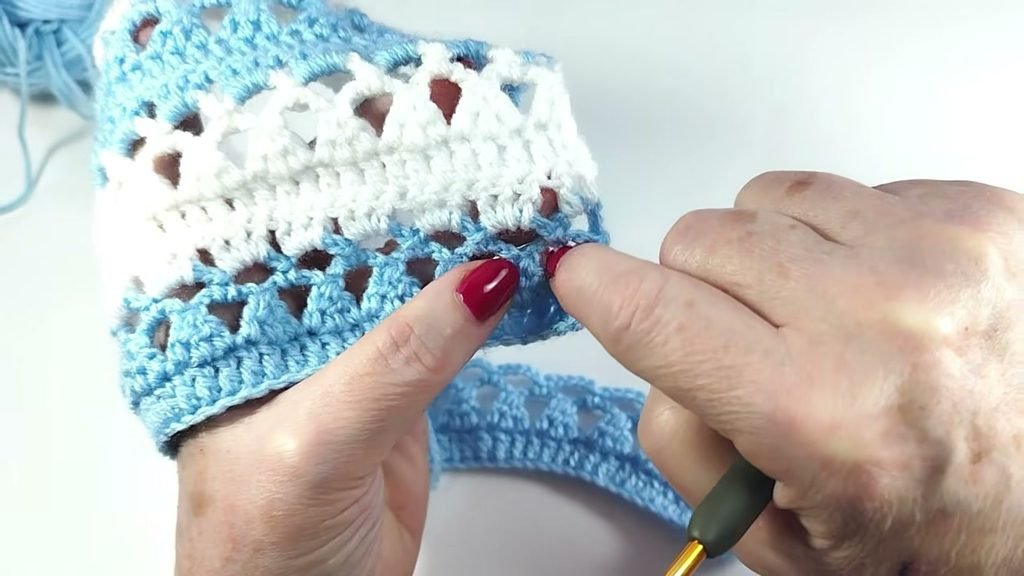
Color Changes and Stripe Sequences
One of the great charms of this stitch is how adaptable it is to color play. In the video tutorial and finished blanket photos, the design features crisp alternating bands of pastel color and soft white.
Here are a few palette ideas that work beautifully:
- Two-Tone Classic (As Shown in Swatch): Alternate Sky Blue and Soft White every 3 rows.
- Four-Color Nursery Ombre (As Shown in Finished Blanket): Rotate between Pale Mint, Sky Blue, Cool Grey, and Pure White. Working 3 rows of each color produces clean horizontal bands framed by lace windows.
- Solid Modern Texture: If you prefer not to weave in ends between stripes, you can crochet the entire blanket in a single solid shade such as buttercream, sage green, or blush pink. The open lace arches provide plenty of visual interest on their own.
Optional Scalloped Border
To give your blanket the finished look seen in the video showcase:
- Round 1 (Base Single Crochet): Using your main border color, work single crochets evenly around the four outer edges of the blanket. Along the row ends, work approximately 2 single crochets around the post of each double crochet row. In each of the four corners, work [1 sc, ch 2, 1 sc]. Join with a sl st to the first sc.
- Round 2 (Shell Scallop Edging): Ch 1. *Skip 1 stitch, work 5 dc into the next stitch, skip 1 stitch, 1 sc into the next stitch*; repeat from * around the entire blanket perimeter. In each corner space, work [7 dc] to allow the shell to fan around the 90-degree corner smoothly. Join with a sl st, fasten off, and weave in all yarn ends.
Video Tutorial
If you prefer watching the stitches worked row by row on video, follow along with the complete step-by-step tutorial below:
Tips and Common Mistakes
- Maintain Relaxed Tension on the Clusters: When working the 3 dc cluster (dc3tog), pull the working loops up to the height of a normal double crochet before drawing through 2 loops. If you pull these loops too tightly, your fabric will bunch inward and curl along the edges.
- Do Not Skip the Final Stitch: Always remember to place the final leg of the ending 2-dc cluster (Row 2) and the final double crochet (Row 3 and Row 4) into the turning chain of the previous row. Missing the turning chain will cause your blanket edges to slant inward.
- Count Your Groups on Row 4: On Row 4, check that every 5-chain arch receives exactly 3 double crochets. Counting your total double crochets at the end of Row 4 ensures your stitch count matches your original Row 1 before starting the next cluster row.
- Weave Ends as You Go: Because you fasten off after every 3-row stripe, weave in your yarn tails every few stripes using a tapestry needle. Tackling the ends along the way prevents a daunting pile of weaving at the very end.
Make More
- Crochet Witch Hat with flowers (Adult Size) —> https://cozyknotty.com/crochet-witch-hat-with-flowers-adult-size/
FAQ
Is this blanket stitch reversible?
Yes. Because the double crochets and three-stitch clusters look nearly identical from both sides, the resulting fabric is fully reversible. The front and back display the same delicate openwork windows and balanced drape.
Can I make this blanket in a single color without cutting yarn?
You can work this entire pattern in a single solid color. When working in one shade, you do not need to cut your thread at the end of Row 3. Simply turn your work, chain 3 (or work a stacked single crochet), and proceed straight into Row 4 by working 3 double crochets into each chain-5 space.
Why are my blanket edges wavy?
Waviness usually happens if you make your 5-chain loops too loose or accidentally place more than 3 double crochets into an arch during Row 4. Keeping a consistent chain tension and counting your stitches after every Row 4 will keep your edges completely straight and rectangular.
What size crochet hook is best if my tension is tight?
If you tend to crochet tightly, move up half a hook size to a 3.5 mm hook. A slightly larger hook keeps the chain loops open and ensures the baby blanket has a soft, pliable drape.
I would love to see your finished blanket projects, so please share your color combinations and questions in the comments below. Happy crocheting, Meryem.