Categories
Uncategorized Amigurumi & Animals Crochet Blankets Crochet Clothing Crochet Flowers Crochet for Beginners Crochet Stitches free crochet patterns Granny Squares Hats, Scarves & Bags Hooks, Yarn & Tools

crochet baby blanket

If you are looking for a gentle, rhythmic stitch pattern that produces soft drape and charming visual texture, this crochet baby blanket design is one of my absolute favourites. By combining solid double crochet foundation rows with delicate three-stitch cluster arches, it creates an open, breathable fabric that keeps little ones warm without feeling heavy. It works up quickly, looks stunning in alternating pastel stripes, and is easy to customise to any custom blanket width. Below you will find the complete written pattern, sizing calculations, stitch guides, and video tutorial.

Although openwork lace can sometimes look intimidating to newcomers, the rhythm of this pattern repeats across just three core rows. Once you master the foundation row and the two-row lace arch sequence, you can crochet along smoothly while watching your favourite television series. Grab your hook, select your softest baby yarns, and let us work through this lovely blanket pattern together.

What Will I Learn?

Following this tutorial step by step will guide you through several versatile crochet skills:

  • Calculating a custom foundation chain using the 3 + 1 stitch multiple rule
  • Crocheting three double crochet clusters across separate stitches to form open triangular windows
  • Building open chain-5 arch netting to balance stitch tension
  • Working double crochet groups directly into open chain spaces to restore a solid row
  • Making clean, invisible color transitions between alternating color stripes
  • Adding an optional scalloped border around the perimeter of your blanket

Materials and Tools

Here is the exact list of supplies I used to create the sample swatch and blanket:

  • Yarn: Light DK or Sport weight acrylic baby yarn (approximately 100 grams / 350 meters per skein). In the tutorial, I used 100% acrylic baby yarn in pastel sky blue and crisp white. For a full baby blanket measuring 75 cm by 75 cm (29.5 by 29.5 inches), you will need approximately 300 to 400 grams (3 to 4 skeins total).
  • Crochet Hook: 3.0 mm crochet hook (US size C-2 or D-3), or the hook size needed to obtain your desired fabric drape.
  • Tapestry Needle: For weaving in yarn tails between color stripes.
  • Scissors
  • Tape Measure: To check your foundation chain length.

Please note on yarn selection: Baby blankets require frequent washing, so I recommend choosing an acrylic, cotton-acrylic blend, or superwash wool yarn that is soft against delicate skin and machine washable. If you decide to substitute yarn weights, a light worsted or standard DK yarn paired with a 3.5 mm or 4.0 mm hook will also produce a wonderfully squishy texture.

Sizing and Stitch Multiples

This stitch pattern is worked over a stitch multiple of 3 + 1, plus 3 turning chains.

Here is how the stitch count works out:

  • Stitch Multiple: Any multiple of 3 (such as 18, 21, 24, 60, 90, 120, or 144).
  • Plus 1: Add 1 base chain to balance the symmetry of the pattern repeat.
  • Plus 3: Add 3 extra chains to serve as the turning chain (this counts as your first double crochet of Row 1).
  • Sample Swatch Calculation:
    • (3 x 6) = 18 chains
    • 18 + 1 = 19 base chains
    • 19 + 3 turning chains = 22 chains total
    • Working into the 4th chain from the hook yields 20 stitches across (1 turning chain-3 plus 19 double crochets).

Project Sizing Chart

  • Practice Swatch (approx 4.5 inches wide): Chain 22 (20 stitches across).
  • Standard Baby Blanket (approx 75 cm x 75 cm / 29.5 x 29.5 inches): Chain 148 (48 pattern repeats of 3 = 144 + 1 + 3 turning chains = 146 stitches across), or simply chain until your un-stretched foundation chain reaches 75 centimeters (29.5 inches), ensuring your total chain count ends on a multiple of 3 plus 4 chains.
  • Large Receiving Blanket (approx 90 cm x 90 cm / 35 x 35 inches): Chain 178 (58 pattern repeats of 3 = 174 + 1 + 3 turning chains = 176 stitches across).
  • Toddler / Crib Throw (approx 100 cm x 125 cm / 40 x 50 inches): Chain 196 (64 pattern repeats of 3 = 192 + 1 + 3 turning chains = 194 stitches across).

Pattern Notes and Abbreviations

  • Crochet Terms: Standard US crochet terminology.
  • Turning Chain: Chain 3 at the beginning of double crochet rows always counts as the first double crochet of the row.
  • Stacked Double Crochet Option: To keep the side edges extra neat and avoid small gaps, you can replace the initial chain-3 with a stacked single crochet (work 1 single crochet in the first stitch, then work 1 single crochet directly into the left vertical bar of that first stitch).
  • Stripe Structure: Each color stripe consists of 3 rows (Row 1 solid base, Row 2 cluster windows, Row 3 chain arches). The new color is introduced at the start of Row 4 (the recovery row).

Abbreviations

  • ch: chain
  • sc: single crochet
  • dc: double crochet
  • st(s): stitch(es)
  • ch-sp: chain space
  • dc3tog: double crochet 3 together (3-dc cluster)
  • dc2tog: double crochet 2 together (2-dc edge cluster)
  • sl st: slip stitch
  • yo: yarn over

Special Stitches

3 Double Crochet Cluster (dc3tog over 3 consecutive stitches)

This stitch creates the pointed triangular peaks in Row 2:

  1. Yarn over, insert hook into the first indicated stitch, yarn over, and pull up a loop (3 loops on hook).
  2. Yarn over and draw through the first 2 loops (2 loops remain on hook).
  3. Yarn over, insert hook into the second indicated stitch, yarn over, and pull up a loop (4 loops on hook).
  4. Yarn over and draw through the first 2 loops (3 loops remain on hook).
  5. Yarn over, insert hook into the third indicated stitch, yarn over, and pull up a loop (5 loops on hook).
  6. Yarn over and draw through the first 2 loops (4 loops remain on hook).
  7. Yarn over and draw through all 4 loops on the hook to close the cluster.

2 Double Crochet Cluster (dc2tog over 2 consecutive stitches)

Used at the end of Row 2 to balance the edge:

  1. Yarn over, insert hook into the next stitch, yarn over, pull up a loop, yarn over, and draw through 2 loops (2 loops on hook).
  2. Yarn over, insert hook into the final stitch (top of turning chain), yarn over, pull up a loop, yarn over, and draw through 2 loops (3 loops on hook).
  3. Yarn over and draw through all 3 loops on the hook.

The Written Pattern

Foundation Chain

Using Color A (Sky Blue) and a 3.0 mm hook, chain 22 for the practice swatch (or chain any multiple of 3 + 1, plus 3 turning chains for your desired blanket width).

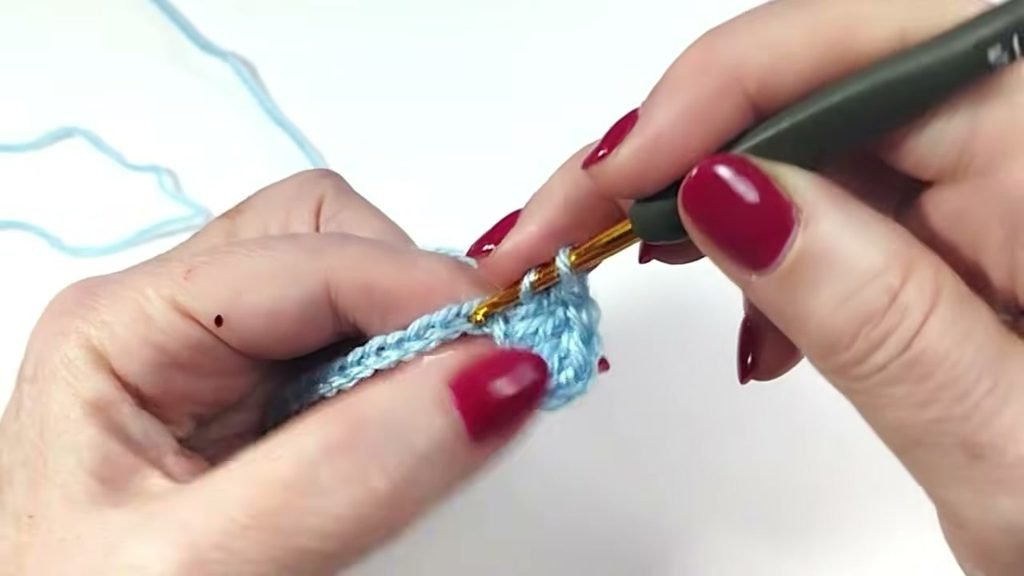
Row 1: Solid Double Crochet Foundation Row

  • Work 1 dc into the 4th chain from your hook (the 3 skipped chains count as your first dc).
  • Work 1 dc into each chain across the foundation chain to the end.
  • Turn your work.
  • (Stitch count: 20 stitches on swatch; 1 turning chain-3 plus 19 dc).
row-1-double-crochet-foundation-row

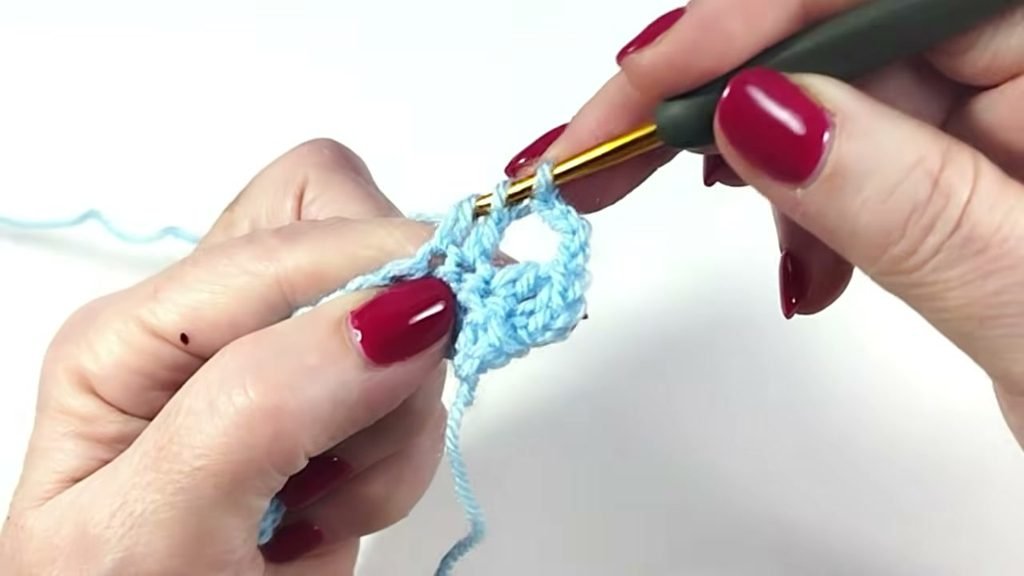
Row 2: Cluster Windows and Chain Spaces

  • Ch 1, work 1 sc into the very first stitch, then work 1 sc into the vertical loop of that sc (counts as 1 dc, or ch 3).
  • Ch 5.
  • *Skip the next 2 stitches, work a 3 dc cluster (dc3tog) across the next 3 stitches, ch 5*; repeat from * across until exactly 2 stitches remain in the row.
  • Finish the row by working a 2 dc cluster (dc2tog) across the last 2 stitches (the final leg goes into the top of the turning chain-3).
  • Turn your work.
  • (On the swatch: 1 initial dc, five ch-5 loops, four 3-dc clusters, and 1 ending 2-dc cluster).
row-2-three-dc-cluster-stitch

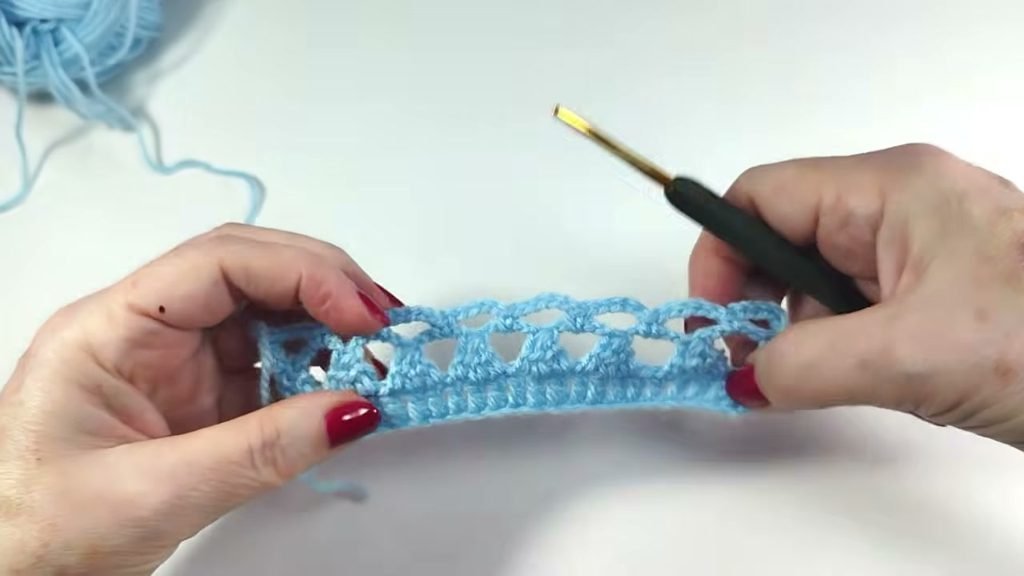
Row 3: Chain-5 Arch Mesh

  • Ch 6 (this counts as 1 dc plus a ch-3 corner space).
  • Work 1 sc into the center of the first ch-5 space.
  • *Ch 5, work 1 sc into the next ch-5 space*; repeat from * across to the final ch-5 space.
  • Finish the row with ch 3, then work 1 dc into the top of the ending cluster stitch from Row 2.
  • Cut Color A, fasten off, and turn your work.
  • (On the swatch: 1 starting dc + ch 3, four full ch-5 arch loops, 1 ending ch-3 + dc).
rows1-to-3-arch-and-cluster-lace

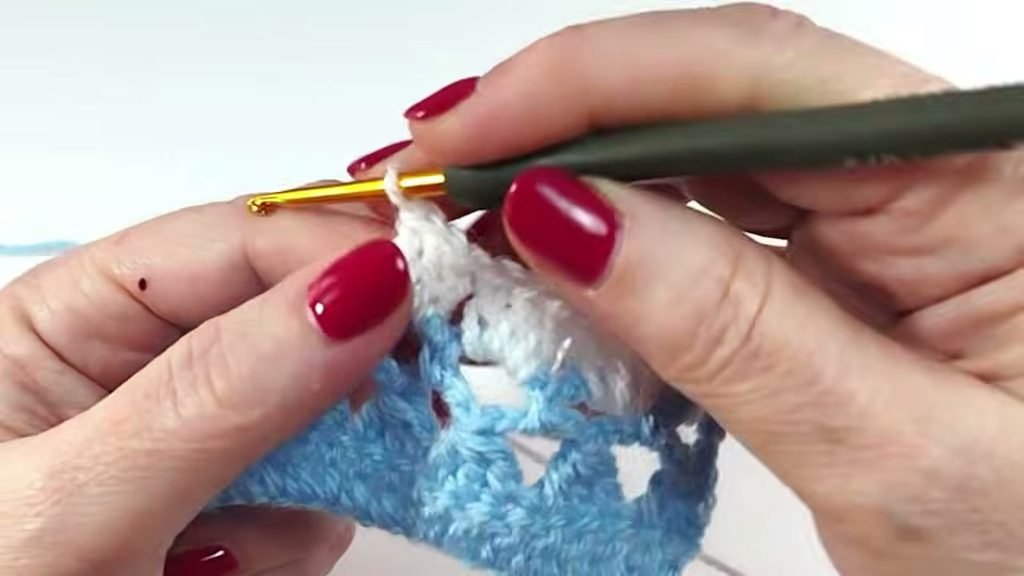
Row 4: Double Crochet Recovery Row (Color Change)

  • Join Color B (White) with a slip stitch into the very first dc stitch.
  • Ch 1, work 1 sc into the first stitch, then 1 sc into the vertical bar (counts as your first dc, or ch 3).
  • *Work 3 dc directly into the next open ch-5 space*; repeat from * across every open ch-5 loop across the row.
  • Into the final turning chain space (the ch-3 space from Row 3), work 3 dc.
  • Finish the row by working 1 dc into the 3rd chain of the turning chain.
  • Turn your work.
  • (Stitch count: exactly 20 double crochets, perfectly restoring your solid stitch count).
row4-contrast-color-dc-groups

Row 5: Repeating Row 2 in Color B

  • Ch 1, work stacked sc in the first stitch (or ch 3, counts as 1 dc).
  • Ch 5.
  • *Skip the next 2 stitches, work a 3 dc cluster (dc3tog) across the next 3 stitches, ch 5*; repeat from * across until 2 stitches remain.
  • Work a 2 dc cluster (dc2tog) across the last 2 stitches.
  • Turn your work.

Row 6: Repeating Row 3 in Color B

  • Ch 6 (counts as 1 dc plus ch 3).
  • Work 1 sc into the first ch-5 space.
  • *Ch 5, work 1 sc into the next ch-5 space*; repeat from * across to the end.
  • Finish the row with ch 3, then work 1 dc into the top of the ending cluster.
  • Cut Color B, fasten off, and turn your work.

Rows 7 and Beyond: Continuing the Blanket Body

  • Join Color A (or your next contrast shade) into the first stitch.
  • Repeat Rows 4 to 6 for each color stripe, changing colors after every 3-row stripe.
  • Continue working your 3-row color blocks until your blanket reaches approximately 73 cm (28.7 inches), or 2 cm short of your final desired length.
  • Final Row: To give the blanket a clean, balanced top edge that mirrors the foundation row, work one final repeat of Row 4 in your chosen border color. Do not fasten off if you plan to add the scalloped border.
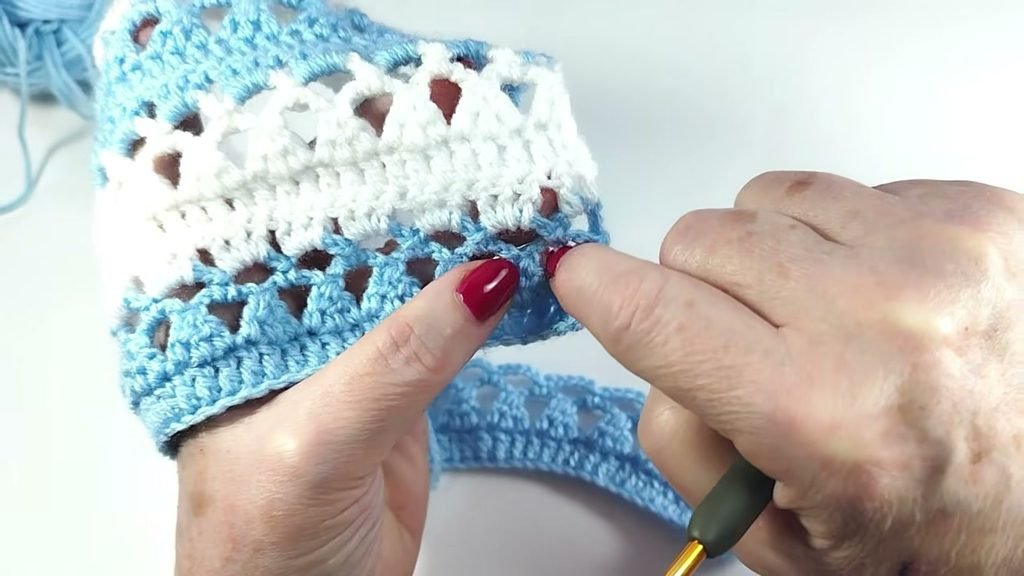
crochet-baby-blanket-stitch-sample

Color Changes and Stripe Sequences

One of the great charms of this stitch is how adaptable it is to color play. In the video tutorial and finished blanket photos, the design features crisp alternating bands of pastel color and soft white.

Here are a few palette ideas that work beautifully:

  1. Two-Tone Classic (As Shown in Swatch): Alternate Sky Blue and Soft White every 3 rows.
  2. Four-Color Nursery Ombre (As Shown in Finished Blanket): Rotate between Pale Mint, Sky Blue, Cool Grey, and Pure White. Working 3 rows of each color produces clean horizontal bands framed by lace windows.
  3. Solid Modern Texture: If you prefer not to weave in ends between stripes, you can crochet the entire blanket in a single solid shade such as buttercream, sage green, or blush pink. The open lace arches provide plenty of visual interest on their own.

Optional Scalloped Border

To give your blanket the finished look seen in the video showcase:

  1. Round 1 (Base Single Crochet): Using your main border color, work single crochets evenly around the four outer edges of the blanket. Along the row ends, work approximately 2 single crochets around the post of each double crochet row. In each of the four corners, work [1 sc, ch 2, 1 sc]. Join with a sl st to the first sc.
  2. Round 2 (Shell Scallop Edging): Ch 1. *Skip 1 stitch, work 5 dc into the next stitch, skip 1 stitch, 1 sc into the next stitch*; repeat from * around the entire blanket perimeter. In each corner space, work [7 dc] to allow the shell to fan around the 90-degree corner smoothly. Join with a sl st, fasten off, and weave in all yarn ends.

Video Tutorial

If you prefer watching the stitches worked row by row on video, follow along with the complete step-by-step tutorial below:

Tips and Common Mistakes

  • Maintain Relaxed Tension on the Clusters: When working the 3 dc cluster (dc3tog), pull the working loops up to the height of a normal double crochet before drawing through 2 loops. If you pull these loops too tightly, your fabric will bunch inward and curl along the edges.
  • Do Not Skip the Final Stitch: Always remember to place the final leg of the ending 2-dc cluster (Row 2) and the final double crochet (Row 3 and Row 4) into the turning chain of the previous row. Missing the turning chain will cause your blanket edges to slant inward.
  • Count Your Groups on Row 4: On Row 4, check that every 5-chain arch receives exactly 3 double crochets. Counting your total double crochets at the end of Row 4 ensures your stitch count matches your original Row 1 before starting the next cluster row.
  • Weave Ends as You Go: Because you fasten off after every 3-row stripe, weave in your yarn tails every few stripes using a tapestry needle. Tackling the ends along the way prevents a daunting pile of weaving at the very end.

Make More

FAQ

Is this blanket stitch reversible?

Yes. Because the double crochets and three-stitch clusters look nearly identical from both sides, the resulting fabric is fully reversible. The front and back display the same delicate openwork windows and balanced drape.

Can I make this blanket in a single color without cutting yarn?

You can work this entire pattern in a single solid color. When working in one shade, you do not need to cut your thread at the end of Row 3. Simply turn your work, chain 3 (or work a stacked single crochet), and proceed straight into Row 4 by working 3 double crochets into each chain-5 space.

Why are my blanket edges wavy?

Waviness usually happens if you make your 5-chain loops too loose or accidentally place more than 3 double crochets into an arch during Row 4. Keeping a consistent chain tension and counting your stitches after every Row 4 will keep your edges completely straight and rectangular.

What size crochet hook is best if my tension is tight?

If you tend to crochet tightly, move up half a hook size to a 3.5 mm hook. A slightly larger hook keeps the chain loops open and ensures the baby blanket has a soft, pliable drape.

I would love to see your finished blanket projects, so please share your color combinations and questions in the comments below. Happy crocheting, Meryem.
Categories
Uncategorized Amigurumi & Animals Crochet Blankets Crochet Clothing Crochet Flowers Crochet for Beginners Crochet Stitches free crochet patterns Granny Squares Hats, Scarves & Bags Hooks, Yarn & Tools

Crochet Witch Hat with flowers (Adult Size)

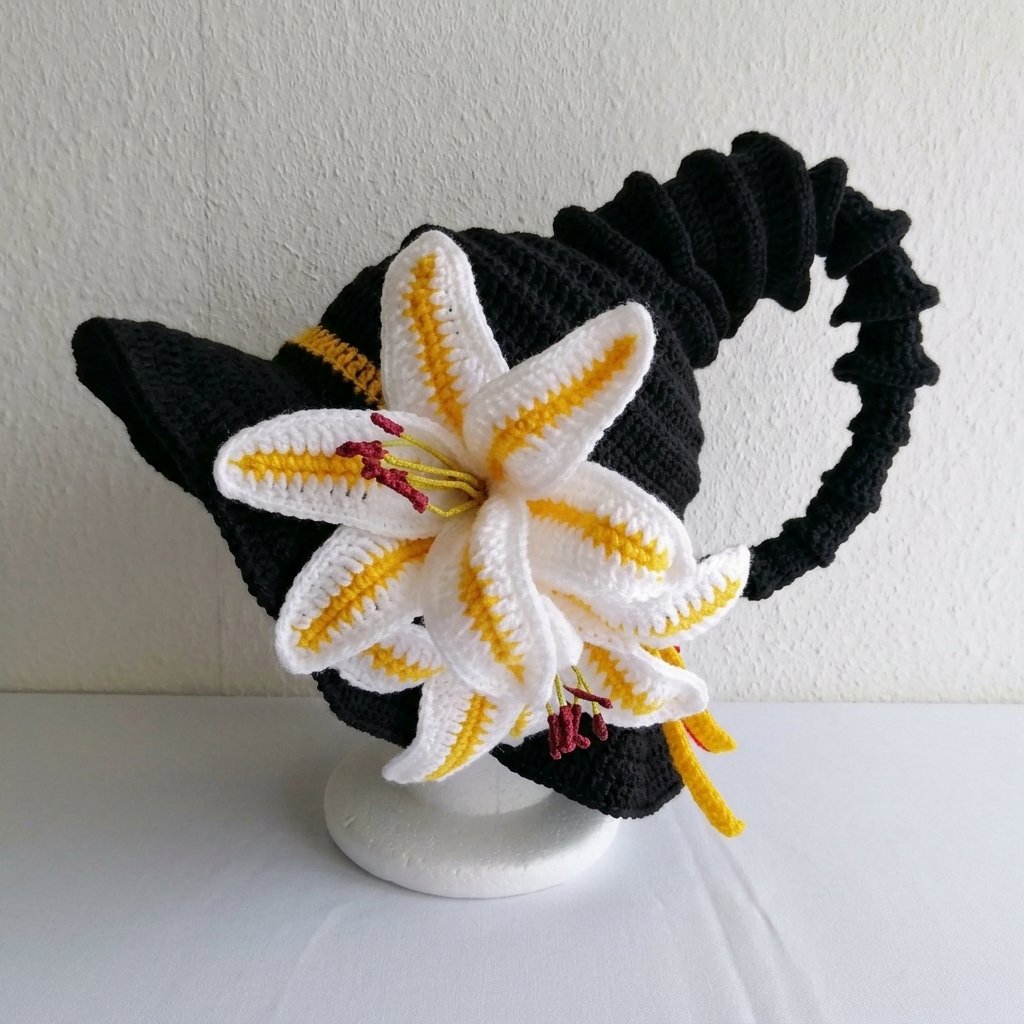
If you are looking for an enchanting, storybook Halloween costume piece, this fantasy crochet spiral witch hat is an absolute showstopper. Designed with a curved horn tip, tiered sculptural ridges along the cone, a wide flared brim, and finished with a striking handmade tiger lily and hatband, this hat brings fairy-tale magic to life. Below you will find the complete written pattern and step-by-step video tutorial.

Worked seamlessly in double crochet from the tip of the curved horn down to the outer brim, this adult-sized pattern offers a comfortable, structured fit. The signature textured ridges are added directly onto the cone with surface crochet, giving the hat its segmented, twisted horn silhouette without requiring complicated seams. Grab your hook, choose your yarn, and let’s bring this whimsical project to your hook.

What Will I Learn?

Following this detailed tutorial will guide you through several essential millinery and garment crochet techniques:

  • Crocheting a slender spiral tube in rounds of double crochet for the curved horn tip
  • Working structured increase tiers to expand from a 12-stitch point to a 90-stitch adult crown
  • Maintaining even stitch counts across cylindrical crown rows for a secure, comfortable fit
  • Calculating mathematical brim increases from 90 double crochets up to 195 stitches
  • Stabilizing a wide crochet brim using a firm slip-stitch perimeter
  • Adding raised surface ruffles (Tiers A, B, and C) to create segmented spiral horn flanges
  • Crafting and assembling a decorative multi-petal crochet tiger lily with stamens and a contrasting hatband

Materials and Tools

Below is everything needed to crochet this spiral witch hat:

  • Main Yarn: Approximately 250 g of worsted weight or DK acrylic yarn in Apple Green.
  • Accent Yarns: Small amounts (approx 30 to 50 g each) of worsted or sport weight yarn in:
    • Golden-Yellow (for the hatband and lily center)
    • White (for the lily petals)
    • Brown or Rust (for the flower stamens)
  • Crochet Hook: 3.0 mm crochet hook (a smaller hook relative to worsted yarn ensures stiff, dense fabric that holds its conical shape).
  • Craft Wire / Floral Wire: (Optional) 18 to 22 gauge craft wire inserted along the tip of the cone or brim edge to maintain the dramatic curve.
  • Notions: Tapestry / yarn needle, sharp scissors, measuring tape, stitch markers.

Please note on yarn choice: A structured, smooth 100% acrylic or wool-blend yarn is ideal for this hat. Stiffer yarns provide the natural body needed for the curved horn and wide brim to stay aloft without flopping.

Finished Size and Gauge

  • Size: Adult (fits head circumferences measuring 21 to 23 inches / 53 to 58 cm).
  • Crown Height: Approximately 18 to 20 inches (45 to 50 cm) from the tip of the curved horn to the base of the crown.
  • Brim Width: Approximately 4 to 5 inches (10 to 12.5 cm) around the entire brim perimeter.
  • Gauge: Approximately 16 dc x 8 rows = 4 inches (10 cm) using a 3.0 mm hook.

Pattern Notes and Abbreviations

This pattern is written in standard US crochet terms.

AbbreviationMeaning
chchain
sl stslip stitch
scsingle crochet
hdchalf double crochet
dcdouble crochet
st(s)stitch(es)
MCmagic circle (or magic ring)
reprepeat

Important Working Guidelines:

  • Turning Chains: Ch 2 at the beginning of each round does not count as a stitch.
  • Joining Rounds: Always slip stitch into the first true double crochet of the round to join; do not slip stitch into the beginning ch-2, as this will distort your stitch count.
  • Increases (Inc): Work 2 double crochet stitches directly into the same designated stitch.
  • Numbers in Brackets: (XX sts) indicates the total number of working stitches upon completing that round.

The Written Pattern: Hat Body & Brim (Rounds 1 to 59)

Section 1: Slender Horn Tip (Rounds 1 to 16)

Round 1: Into a magic circle (or ch-3 ring), work 12 dc. Join with a sl st to the first dc. (12 sts)

Rounds 2-16: Ch 2, work 1 dc into each stitch around. Sl st into the first dc to join. (12 sts per round)

(After Round 16, you will have a long, slender tube forming the curved tip of the horn).

Section 2: First Cone Expansion (Rounds 17 to 27)

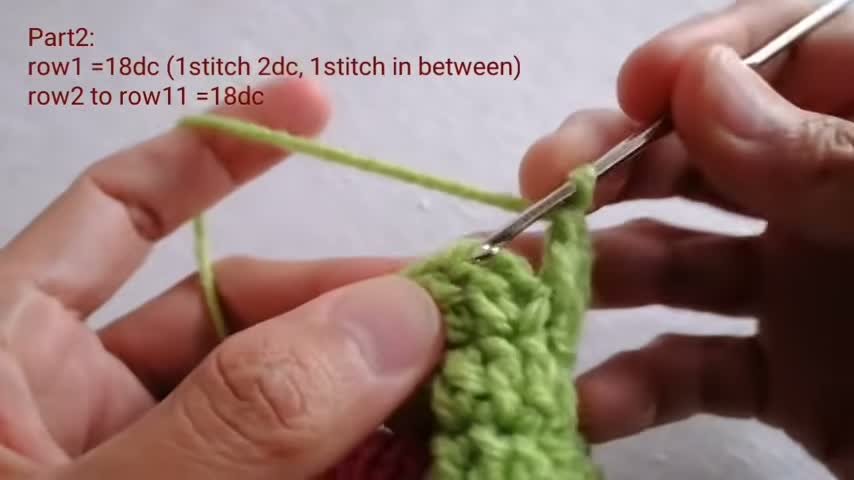
Round 17: Ch 2, *1 dc in the first stitch, 2 dc in the next stitch (increase)*; repeat from * around to the end of the round. Sl st to the first dc. (18 sts)

Rounds 18-27: Ch 2, work 1 dc into each stitch around. Join with a sl st to the first dc. (18 sts per round)

Crocheting the upper cone rows and expanding the stitch count from 12 dc to 18 dc.

Section 3: Mid-Cone Expansion (Rounds 28 to 38)

Round 28: Ch 2, work 2 dc in every stitch around (increase in each stitch). Join with a sl st to the first dc. (36 sts)

Rounds 29-38: Ch 2, work 1 dc into each stitch around. Join with a sl st to the first dc. (36 sts per round)

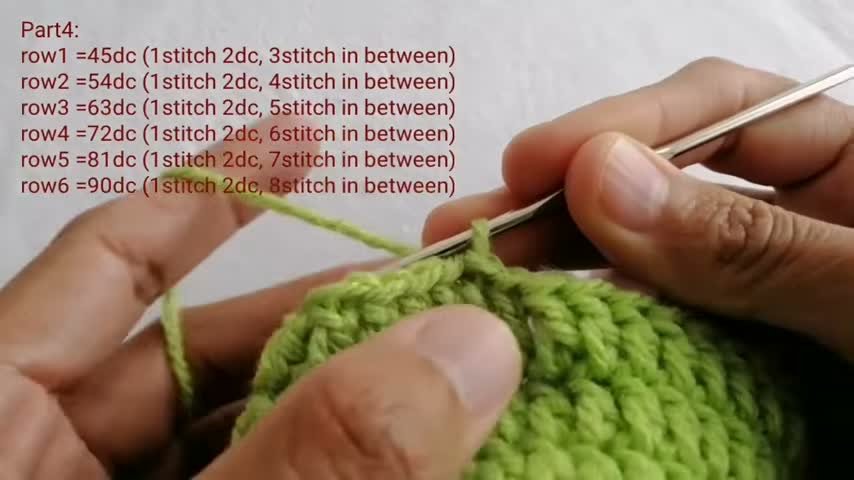
Section 4: Crown Slope Increases (Rounds 39 to 44)

(In this section, we increase by 9 stitches per round to create a tapering cone leading into the head).

Round 39: Ch 2, *1 dc in each of the next 3 stitches, 2 dc in the next stitch*; repeat from * around. Join with a sl st. (45 sts)

Round 40: Ch 2, *1 dc in each of the next 4 stitches, 2 dc in the next stitch*; repeat from * around. Join with a sl st. (54 sts)

Round 41: Ch 2, *1 dc in each of the next 5 stitches, 2 dc in the next stitch*; repeat from * around. Join with a sl st. (63 sts)

Round 42: Ch 2, *1 dc in each of the next 6 stitches, 2 dc in the next stitch*; repeat from * around. Join with a sl st. (72 sts)

Round 43: Ch 2, *1 dc in each of the next 7 stitches, 2 dc in the next stitch*; repeat from * around. Join with a sl st. (81 sts)

Round 44: Ch 2, *1 dc in each of the next 8 stitches, 2 dc in the next stitch*; repeat from * around. Join with a sl st. (90 sts)

Working the continuous 9-stitch increase rows to shape the tapering cone into the 90-stitch crown.

Section 5: Adult Crown Body (Rounds 45 to 51)

(These 7 straight rounds form the cylindrical crown that fits an adult head measuring 21 to 23 inches).

Rounds 45-51: Ch 2, work 1 dc into each stitch around. Join with a sl st to the first dc. (90 sts per round)

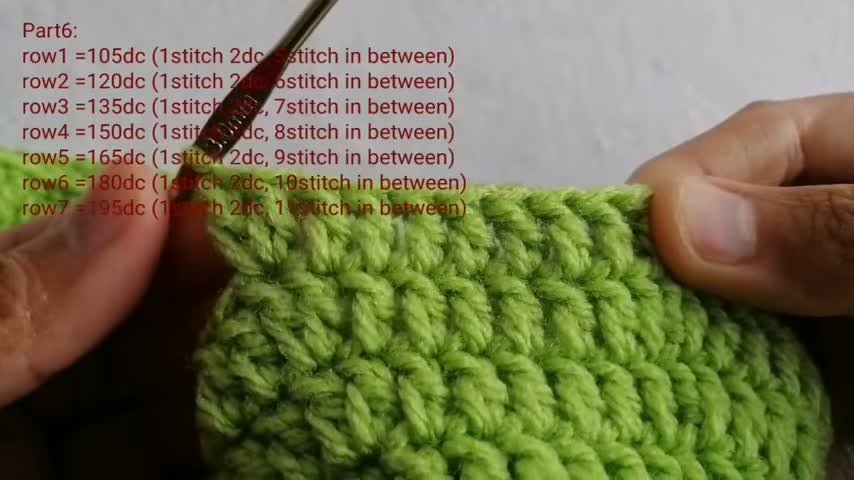
Section 6: Wide Flared Brim (Rounds 52 to 58)

(We now expand the brim by 15 stitches on every round to create a dramatic circular flare).

Round 52: Ch 2, *1 dc in each of the next 5 stitches, 2 dc in the next stitch*; repeat from * around. Join with a sl st. (105 sts)

Round 53: Ch 2, *1 dc in each of the next 6 stitches, 2 dc in the next stitch*; repeat from * around. Join with a sl st. (120 sts)

Round 54: Ch 2, *1 dc in each of the next 7 stitches, 2 dc in the next stitch*; repeat from * around. Join with a sl st. (135 sts)

Round 55: Ch 2, *1 dc in each of the next 8 stitches, 2 dc in the next stitch*; repeat from * around. Join with a sl st. (150 sts)

Round 56: Ch 2, *1 dc in each of the next 9 stitches, 2 dc in the next stitch*; repeat from * around. Join with a sl st. (165 sts)

Round 57: Ch 2, *1 dc in each of the next 10 stitches, 2 dc in the next stitch*; repeat from * around. Join with a sl st. (180 sts)

Round 58: Ch 2, *1 dc in each of the next 11 stitches, 2 dc in the next stitch*; repeat from * around. Join with a sl st. (195 sts)

Crocheting the broad, dramatic brim rows expanding by 15 double crochets per round.

Section 7: Brim Edge Finishing (Round 59)

Round 59: Work 1 slip stitch into every stitch around the entire brim perimeter. Sl st into the first sl st to join. Fasten off and weave in all yarn ends. (195 sts)

(This slip-stitch border firms up the outer edge, preventing waviness and helping the wide brim hold its circular shape).

Surface Sculptural Ridges (Tiers A, B, & C)

(These raised circular ruffles are worked directly around the exterior posts of the cone to create the iconic segmented spiral horn ridges).

Tier A: Slender Tip Ridges (Worked 4 times)

  • Starting 5 rounds down from the tip (around Round 5): attach Apple Green yarn around the post of any stitch in that round.
  • Row 1: Work 1 single crochet around each stitch post around the circumference. Sl st to join, fasten off, and weave in ends.
  • Repeat this single-row ridge 4 times in total, leaving 5 rounds of plain dc between each ridge (worked approximately at Rounds 5, 10, 15, and 20).

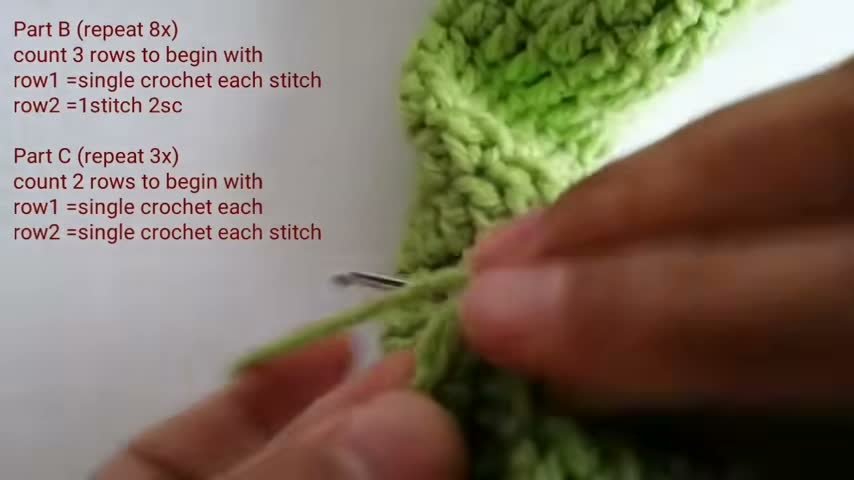
Tier B: Flared Ruffle Ridges (Worked 8 times)

  • Count 3 rounds down from the previous ridge:
    • Row 1: Work 1 single crochet around each stitch post around the cone. Join with a sl st.
    • Row 2: Ch 1, work 2 single crochets in each stitch around. Join with a sl st, fasten off. (This increase round forces the ridge to fan outward into a flared accordion ruffle).
  • Repeat this 2-round flared ruffle 8 times in total, spacing each ridge 3 rounds apart down the middle cone.

Tier C: Lower Cone Structured Ridges (Worked 3 times)

  • Count 2 rounds down from the previous ruffle:
    • Row 1: Work 1 single crochet around each stitch post around the circumference. Join with a sl st.
    • Row 2: Ch 1, work 1 single crochet in each stitch around. Join with a sl st, fasten off.
  • Repeat this 2-round structured ridge 3 times in total, spacing each ridge 2 rounds apart as the cone transitions into the crown.

Tiger Lily Flower & Hatband

1. Contrasting Yellow Hatband

  • Using Golden-Yellow yarn, chain 95 to 105 chains (or until the chain cord measures approx 28 to 30 inches).
  • Work 1 row of single crochet back along the chain. Fasten off.
  • Wrap the band snugly around the junction where the crown meets the brim (between Rounds 51 and 52) and tie with hanging tails on the side.

2. Crocheted Tiger Lily Petals (Make 6)

  • Center Petal Strip: With Golden-Yellow yarn, chain 22.
    • In 2nd ch from hook, work: 1 sc, 1 hdc in each of next 2 ch, 1 dc in each of next 14 ch, 1 hdc in each of next 2 ch, 3 sc in the final chain to turn around the point.
    • Working back down the opposite edge: 1 hdc in each of next 2 ch, 1 dc in each of next 14 ch, 1 hdc in each of next 2 ch. Join with a sl st to the first sc.
  • Outer Wired Border: Drop yellow and join White yarn. Lay a thin strand of craft/floral wire along the outer edge of the petal, crocheting over it:
    • Sc in each stitch up the petal side, work [1 sc, ch 1, 1 sc] into the tip point, and sc in each stitch down the other side. Fasten off leaving a wire and yarn tail.

3. Stamens & Pistil

  • Cut 6 lengths of floral wire (approx 4 inches each).
  • Wrap 5 wire tips with rust or brown thread to form realistic anthers, and wrap the remaining wire with pale green yarn for the pistil.

4. Flower Assembly & Attachment

  • Bundle the stamens around the pistil in the center.
  • Arrange 3 petals as an inner layer, and 3 petals overlapping as an outer layer.
  • Twist the wire stems together at the base, and use the yarn tails to stitch the lily firmly onto the front brim directly over the yellow hatband tie.
  • Gently bend and curl the wired petals outward to mimic a blooming lily, and curve the tip of the horn over to complete your fantasy silhouette.

Video Tutorial

If you prefer to follow along with every stitch count, ridge tier, and assembling step visually, watch the complete video tutorial below: https://www.youtube.com/embed/IW4h97jiAEM

Tips and Common Mistakes

  • Use a Tight Tension: Using a 3.0 mm hook with worsted yarn creates a stiff, dense weave that naturally resists slouching. Keep your yarn tension firm throughout the cone and brim.
  • Insert Wire for the Horn Tip: If your curly tip needs extra help holding its arch, slide a 12-inch piece of covered craft wire into the hollow tip of Part 1 before working Part 3.
  • Count Stitches on the Slope: Part 4 increases by exactly 9 stitches on every row (Row 1 has 45, Row 2 has 54, etc.). Place a stitch marker at the beginning of each round to avoid skipping increases.
  • Surface Ruffle Alignment: When working surface ruffles, follow the horizontal line between rows carefully so each circular ruffle sits straight and parallel around the cone.

FAQ

What size head does this hat fit?

This pattern is sized for an adult, fitting head circumferences between 21 and 23 inches (53 to 58 cm). The 7 straight rows of 90 dc in Rounds 45 to 51 ensure a comfortable, standard adult crown fit.

Can I make the brim wider or narrower?

Yes! To make a narrower brim, stop after Round 56 or Round 57. To make a wider, dramatic brim, simply continue adding increase rows following the established formula (e.g. Round 59 with 1 st 2 dc and 12 sts in between for 210 dc).

Does the hat require starch or stiffening spray?

Because it is worked tightly with a 3.0 mm hook, the hat holds its shape on its own. However, if your yarn has a softer drape, spraying the brim lightly with fabric stiffener or diluted PVA glue will give it a crisp, theatrical finish.

Can I customize the flower colors?

Definitely! While this tutorial features a striking white and golden-yellow tiger lily, you can craft black roses, deep purple dahlias, or fiery autumn marigolds to match your personal costume palette.

I would love to see your magical creations and unique color pairings, so please share your finished witch hats in the comments below. Happy crocheting, Meryem.