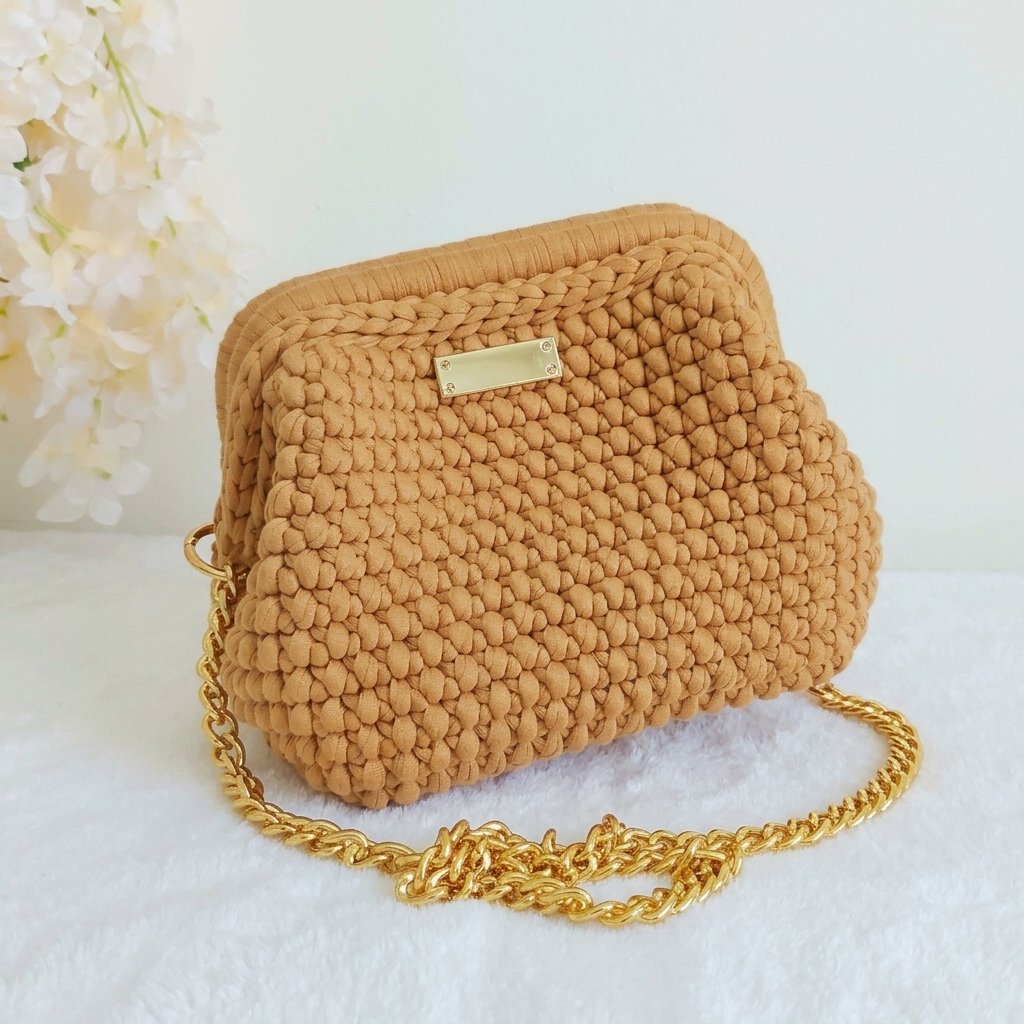
If you are looking for an accessory that combines modern style with everyday function, this crochet clutch bag is a wonderful crochet bag pattern to add to your queue. Featuring an internal metal squeeze frame and a dense twisted stitch texture, this bag works up into a firm, structured pouch that holds its shape without requiring a separate fabric lining. You can carry it as an evening clutch, snap on a chain strap for hands-free shopping, or tuck it into a larger tote as a chic cosmetic pouch.
I have put together both the complete step-by-step written pattern and the embedded video tutorial in this post, so you can follow along with every stitch, count, and finishing technique. This post is based on the video tutorial by Mary Tejidos, linked below. Take your time working the stitches with a firm tension, and you will have a gorgeous bag ready to wear in just a weekend.
Table of Contents
What Will I Learn?
In this tutorial, I will guide you through all the steps required to create a sturdy, professional-looking handbag from scratch. You will learn:
- How to measure and crochet a custom rectangular single crochet base tailored to your metal frame size.
- How to work single crochet stitches into the back humps of a foundation chain for a clean, even edge.
- How to work corner increases to turn a flat rectangle into an oval-edged perimeter base.
- How to work the twisted single crochet stitch (punto torcido) to create a dense, ribbed texture.
- How to complete seamless round transitions so your join lines remain completely invisible.
- How to cover a tubular metal squeeze frame (boca de lobo) with crochet stitches.
- How to join the covered frame to the bag body using slip stitches and attach carabiner strap hardware.
Materials and Tools
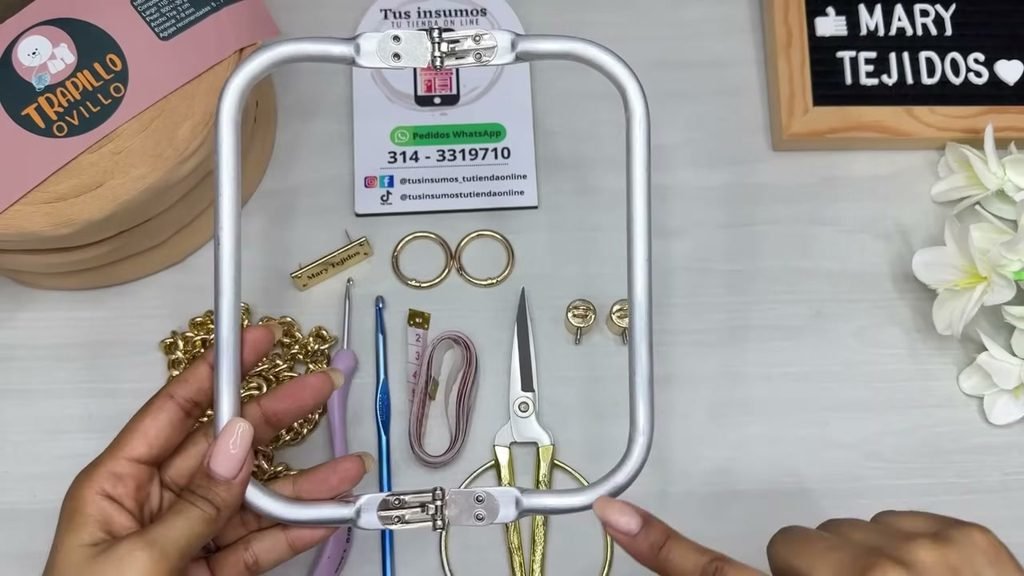
Below is the exact list of supplies I used to create this clutch bag:
- Yarn: Premium feather t-shirt yarn (trapillo pluma), 3 cm strand width. I used approximately 540 grams from a total of 750 grams (three 250 g bobbins). This yarn is lightweight, smooth, and very gentle on the hands.
- Crochet Hooks: 6.0 mm crochet hook (main hook for the base, body, and frame covering) and a 3.5 mm crochet hook (for weaving yarn ends under tight stitches).
- Hardware Frame: One internal metal squeeze/spring frame (boca de lobo) measuring 16 cm wide by 18 cm long on the inside opening.
- Strap Hardware: Two 3 cm diameter carabiner snap gate rings and one 80 cm aluminum chain strap.
- Notions: Measuring tape, sharp scissors, stitch markers, small scraps of contrasting yarn for securing pieces, and craft silicone or fabric glue for securing woven ends.
- Optional: One metal logo or brand label plate.
Yarn substitution advice: If you cannot find feather t-shirt yarn, look for a lightweight cotton ribbon yarn, a 5 mm braided cotton cord, or standard t-shirt yarn cut to a 3 cm width. Keep in mind that standard jersey t-shirt yarn is heavier than feather yarn, so your completed clutch may weigh a little more.
Finished Size and Gauge
The finished clutch bag measures approximately 21 cm wide by 19 cm tall when open, and 19 cm tall when closed. The structured rectangular base measures 14.5 cm wide by 15.5 cm long before working the bag sides. The body of the bag is worked to a height of 16.5 cm before attaching the top frame. The total weight of the completed clutch, including yarn and hardware, is approximately 620 grams.
Gauge and tension: In this project, stitch density is far more important than meeting an exact stitch gauge. Your single crochet stitches must be worked tightly so that no light passes through the fabric. If your stitches appear loose or spaced out, switch to a smaller hook such as 5.5 mm or 5.0 mm to keep the base and body firm and supportive.
Pattern Notes and Abbreviations
Please review these notes before you pick up your hook:
- Terms: This pattern is written in standard US crochet terms and US spelling.
- Turning chain: The chain 1 made at the beginning of flat rows does not count as a stitch throughout the base. Always work your first single crochet into the very first stitch.
- Squeeze frame sizing: The length and width of your base depend on the internal dimensions of your squeeze frame. When your foundation chain is placed inside your frame, there should be a 2 cm gap on each side. After row 1 is complete, that gap reduces to 1 cm on each side, which is later filled by the perimeter border.
- Seamless round joins: Each body round ends by pulling an elongated loop through the first stitch from back to front, then inserting the hook between the strands behind the join to start the next round without a visible seam.
- Hinge clearance: When covering the metal frame, a chain space is placed directly over each hinge so the metal mechanism can flex freely without catching on the yarn.
Abbreviations (US Terms):
- ch: chain
- sc: single crochet
- sl st: slip stitch
- st(s): stitch(es)
- twisted sc: twisted single crochet
- inc: increase (work 3 sc in the same space at corners)
The Written Crochet Bag Pattern
Step 1: The Rectangular Base
Start with your 6.0 mm hook and t-shirt yarn. Leave a short tail for weaving.
Foundation Chain: Tie a slip knot, then chain 14 loosely. This chain should measure approximately 11 cm in length. Chain 1 more for height (total of 15 chains). Place this chain inside your squeeze frame to confirm you have approximately 2 cm of space on each side.
Row 1: Turn the chain over to view the back humps (lomitas). Insert your hook under the back hump of the second chain from the hook, yarn over, pull up a loop to the height of the hook, yarn over, and pull through both loops. Work 1 sc under the back hump of each remaining chain across to the end. Turn. (14 sc, measuring 13 cm wide with a 1 cm margin inside the frame on each side)
Row 2: Ch 1 (does not count as a stitch). Insert hook under both loops of the very first stitch, yarn over, pull up a loop, yarn over, and pull through two loops. Work 1 sc in each of the remaining 13 stitches across, making sure not to skip the final stitch. Turn. (14 sc)
Rows 3 to 16: Repeat Row 2. Maintain an even, firm tension so the fabric stays flat and dense without gaps between stitches. After completing 16 rows, your base should measure 14.5 cm wide by 15.5 cm long. Lay the piece inside your metal frame to verify that there is approximately 1 cm of clearance on all four sides.
Perimeter Round (Base Border): Do not turn your work after Row 16. You will now crochet around all four edges of the base, adding triple increases in each corner to create a rounded rectangular bottom with exactly 66 stitches.
- Corner 1 & Long Side 1: Ch 1, place a marker in this chain, and work 1 sc into the corner stitch. Work 15 sc evenly down the row ends along the long side (1 sc per row end). (15 sc along the side edge, plus 1 corner stitch)
- Corner 2 & Short Side 1: In the first foundation chain space, work 3 sc for the corner increase. Work 1 sc in each of the next 12 chain loops across the bottom edge. (12 sc)
- Corner 3 & Long Side 2: In the last chain loop, work 3 sc for the corner increase. Work 15 sc evenly along the second long edge, placing 1 sc into each row end. (15 sc)
- Corner 4 & Short Side 2: In the first stitch of the top edge, work 3 sc for the corner increase. Work 1 sc in each of the next 12 stitches across to the starting corner. (12 sc)
- Finish Starting Corner: Work 1 sc into the very first corner space where you made the ch 1 and first stitch. Cut yarn, pull the working loop free, and thread your yarn onto your smaller hook. Insert the hook from back to front under both loops of the first full stitch, pull the tail through to the back, then insert the hook up through the center of the final chain loop to bring the tail to the wrong side. This creates an invisible join that forms the third stitch of the starting corner. (66 stitches total around the base)
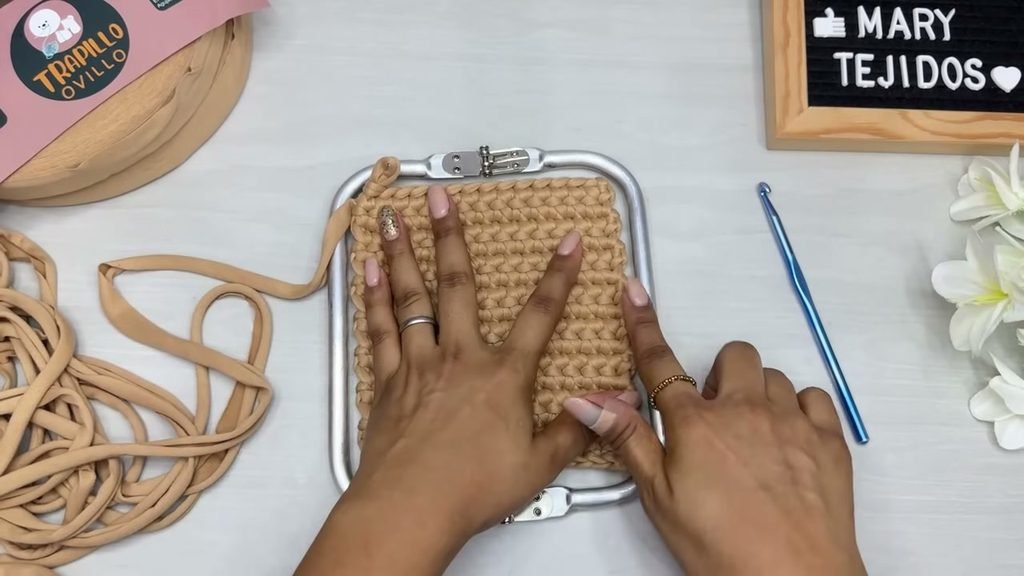
Weave in all tails securely along the wrong side of the base using your 3.5 mm hook.
Step 2: Bag Body in Twisted Single Crochet
Turn the base over so the wrong side (the side with the horizontal ridges) is facing upward. You can join your yarn in any stitch along the perimeter. I recommend starting near the middle of one long side.
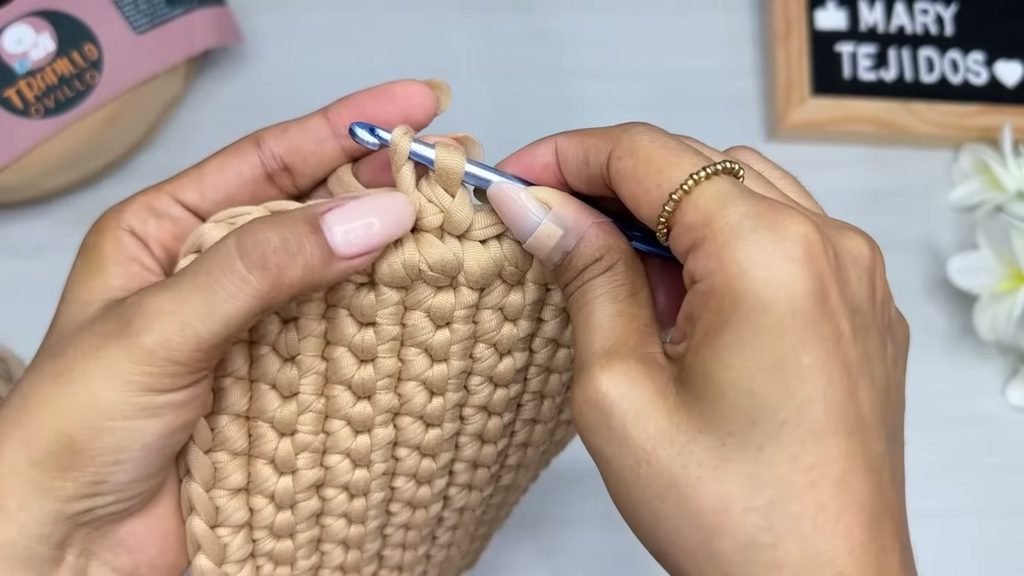
How to work the twisted single crochet (punto torcido): Insert your hook under both loops of the stitch, yarn over, pull up a loop, and twist the hook inward towards yourself so the working strand crosses over. Pull up the loop slightly to match the height of the loop on your hook, yarn over, and pull through both loops.
Round 1: Insert hook under both loops of your chosen stitch, draw up a loop, and work 1 twisted sc. Work 1 twisted sc into every stitch around the base, keeping your stitches aligned and working over the starting tail to secure it. Do not work any increases or decreases. (66 sts)
Invisible Round Closure: At the end of the round, pull the active loop slightly longer. Remove your hook, insert it from back to front under both loops of the very first stitch of the round, catch the elongated loop, and pull it to the inside of the bag. Insert your hook from front to back through the space between the two posts right below the pulled loop, place the loop back on your hook, adjust the working yarn tension, yarn over, and draw the loop through to the front. Twist the hook inward, yarn over, and pull through to form the first stitch of the next round.
Rounds 2 to 14: Work 1 twisted sc in each stitch around (66 sts). Close each round using the invisible closure technique described above. As your rounds grow, smooth the fabric with your hands so the twisted stitches stack neatly.
After completing Round 14, the body of the bag should measure approximately 16.5 cm in height from the base. Test the height by pinching the two top edges together: they should meet comfortably without pulling or distorting the fabric. Fasten off with an invisible join and weave in the end on the inside.
Step 3: Covering the Squeeze Metal Frame
Now prepare your metal squeeze frame (boca de lobo). First, fold your bag body flat and find the two exact center points along the sides. Count 33 stitches on one side and 33 stitches on the other, placing a stitch marker at each hinge position. These markers indicate where the hinges of your frame must sit.
To cover the frame, hold it open with the right side facing you:
- Side 1: Attach t-shirt yarn onto the metal arm right beside one hinge. Work 32 sc directly around the metal bar. Keep the curl of the t-shirt yarn facing inward so the surface of each stitch looks smooth and uniform. Space the 32 stitches evenly along the arm up to the next hinge. (32 sc)
- Hinge 1: Do not crochet over the metal hinge itself, as this would stop the spring mechanism from closing properly. Instead, pull up the active loop and chain 1 in the air directly across the hinge joint. (1 ch)
- Side 2: Work 32 sc directly around the second metal arm, sliding the stitches along if necessary to fit all 32 stitches neatly before reaching the starting hinge. (32 sc)
- Hinge 2: Cut the yarn leaving a 10 cm tail. Pull the loop through. With your smaller hook, insert the hook from back to front under the first sc of Side 1, pull the yarn tail through, then insert the hook back down through the center of the 32nd sc. This creates a faux chain stitch spanning the second hinge. (66 stitches total: 32 sc + 1 ch + 32 sc + 1 ch)
Weave the yarn ends under the stitches along the inside of the frame. Apply a tiny dot of silicone or fabric glue to the yarn tails so they remain anchored during daily use.
Step 4: Joining the Frame to the Bag Body
Place the crocheted frame onto the top edge of the bag body. Align the frame hinges directly above the stitch markers you placed earlier. Thread short lengths of scrap t-shirt yarn through the hinge chains and the marked bag stitches, tying loose knots to hold the frame firmly in place while you join.
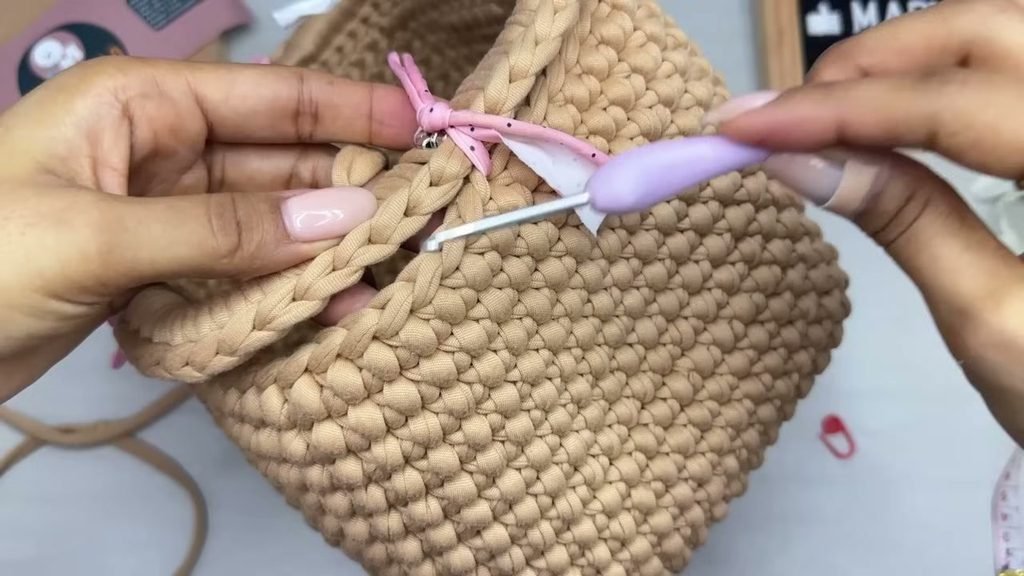
With your 6.0 mm hook, join the two pieces using slip stitches:
- Insert your hook through the center of a chain stitch on the frame, then through the center of the corresponding stitch on the bag body.
- Yarn over with your working yarn and draw a loop through both layers and through the loop on your hook to form a slip stitch.
- Continue working 1 sl st through both layers for every stitch around the perimeter, removing the scrap ties as you approach them. At the hinges, slip stitch through the hinge chain stitch and the marked center bag stitch below it.
- When you reach the starting point, cut the yarn, draw the tail through, and complete an invisible finish under the first slip stitch.
- Weave the yarn ends along the inside of the bag, trimming any excess.
Step 5: Hardware and Finishing Touches
To complete the bag, open the squeeze frame and locate the stitches directly below each hinge seam:
- Take one 3 cm carabiner ring, press the gate open, and pass it around two strong stitches right underneath the hinge seam. Snap the ring closed. Repeat on the opposite side with the second carabiner ring.
- Attach the ends of your 80 cm chain strap to the carabiner rings.
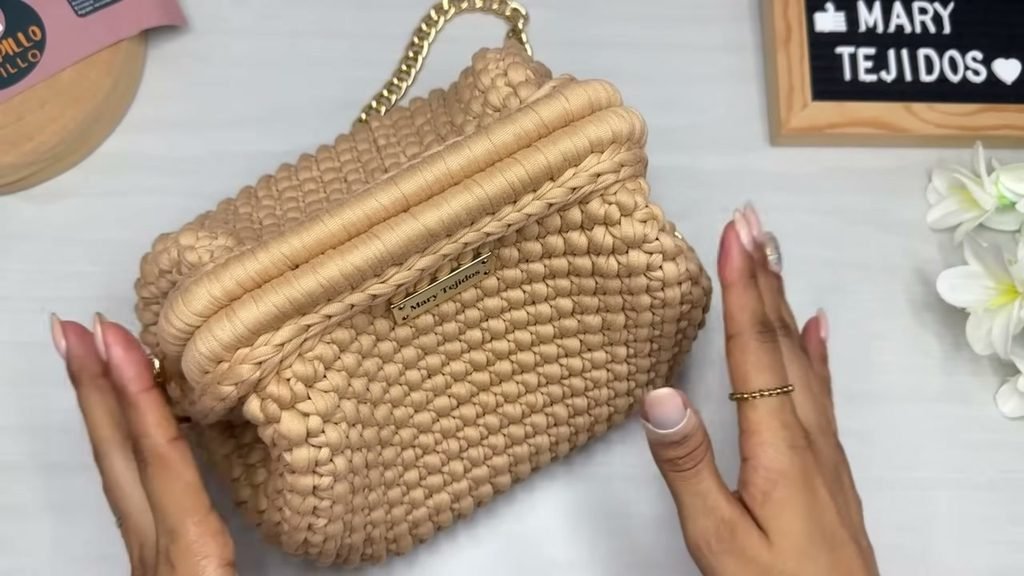
- If you have a metal logo or nameplate, center it on the front of the clutch approximately 4 rows below the frame, insert the prongs through the fabric, and bend them flat on the inside.
Video Tutorial
If you prefer watching the hands in motion or want to double-check the twisted stitch technique, watch the full video tutorial below:
https://www.youtube.com/watch?v=3ZEye3Y7voc
Tips and Common Mistakes
Here are several helpful practical tips to ensure your clutch bag turns out neat and symmetrical:
- Keep your stitches tight: A loose stitch tension will cause the t-shirt yarn to sag under the weight of the metal frame. Check your work after three rows of the base; if you see gaps of light between the posts, change to a smaller hook size.
- Twist the hook inwards: When working the twisted single crochet, always turn your hook head inward towards your palm before pulling the loop up to height. This creates the signature crossed-strand look and keeps the stitches dense.
- Check frame clearance regularly: Squeeze frames can vary slightly by manufacturer. Test your base inside your frame after row 1 and after completing the perimeter round to make sure you have the required dimensions before moving onto the body.
- Never crochet over the hinge: Wrapping yarn over the metal hinge will bind the spring and prevent the frame from snapping shut tightly. Always chain 1 in the air across the hinge.
- Secure your ends with adhesive: T-shirt yarn is smooth and slippery. After weaving your ends through several stitches, place a small drop of craft silicone or textile glue on the tip of the tail to prevent it from sliding free over time.
Related Patterns
Looking for another crochet bag pattern? Here are three fun patterns to try next:
- Crochet Beanie Pattern —> https://cozyknotty.com/crochet-beanie-pattern/
- crochet baby blanket —> https://cozyknotty.com/crochet-baby-blanket/
Frequently Asked Questions
Can I make this clutch bag with regular cotton yarn instead of t-shirt yarn?
Yes, you can substitute other yarns, but you will need to hold multiple strands of worsted weight cotton together or choose a 5 mm braided cotton cord to achieve the required thickness. If your yarn is too thin, the stitches will lack the body needed to support the squeeze frame.
What should I do if my metal frame is a different size?
You can easily adjust the pattern to fit any size frame. Measure the inside width and length of your frame, start with a foundation chain that leaves 2 cm on each side, and work rows until the base reaches 1 cm below the top and bottom edges. Remember to count your total border stitches so you can divide them equally between the two frame sides.
Why is the base of my bag curling up at the edges?
Curling usually happens if your foundation chain was pulled too tight or if your corner increases do not have enough slack. Take care to pull each loop up to the full height of your hook when working the 3 sc corner increases, which will help the base lie completely flat.
How does the squeeze frame stay closed without a clasp or zipper?
The internal metal squeeze frame uses built-in spring tension. When you push the two side hinges inward, the frame pops open wide, and when you release or push the two sides together, the internal spring mechanism snaps securely shut.
I would love to see your finished clutch bag, so please share your photos in the comments and let me know what colors you chose. Happy crocheting, Sara.