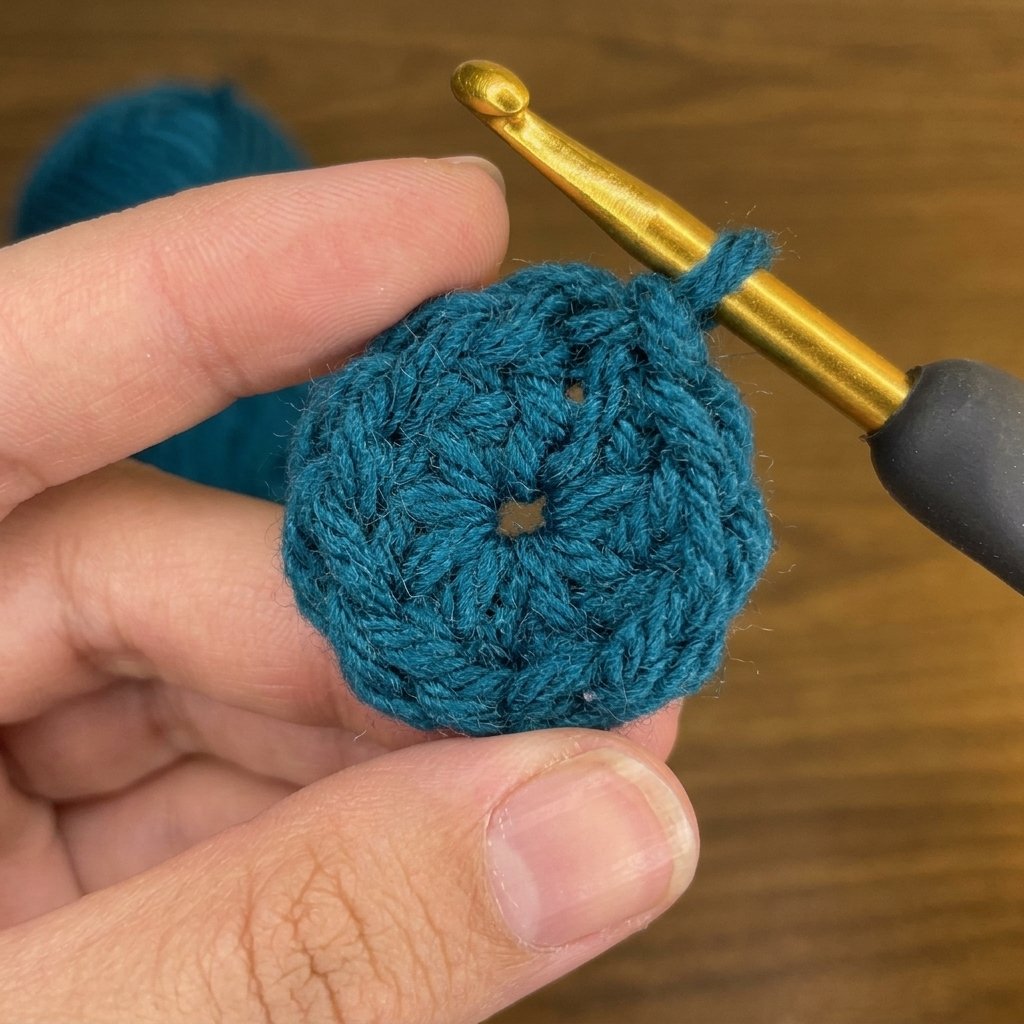
Starting a circular crochet project with a completely closed, hole-free center is one of the most rewarding milestones for any crocheter. The magic ring, also widely known as the magic circle or adjustable loop, is the gold standard foundation technique for granny squares, amigurumi plushies, round beanies, coasters, and mandalas. While traditional methods of joining chains into a circle often leave an unsightly hole that allows stuffing or light to peek through, a magic ring pulls completely shut into a tight, seamless center.
Although the finger placement can feel slightly awkward when you first attempt it, once your muscle memory kicks in, you will be able to form a magic circle in mere seconds without even looking at your hands. In this comprehensive beginner guide, I walk you through the entire process slowly and clearly, covering both right-handed and left-handed methods, how to work your first round of stitches into the loop, and how to lock your tail so it never comes undone. This post is based on the video tutorial by Heritage Charm Crochet, linked below.
Table of Contents
What Is a Magic Ring?
A magic ring is an adjustable foundation loop that acts like a drawstring. Instead of working your opening stitches into a fixed chain ring or into a tight single chain, you crochet directly over an open sliding loop of yarn and its tail end. Once your first round of stitches is finished, you pull the yarn tail firmly, cinching the center opening down to zero diameter.
This technique provides three distinct advantages for your projects:
- Gapless Center: It completely eliminates the hollow hole in the middle of circular items, which is critical for stuffing amigurumi toys.
- Custom Tension: You can adjust the circle to be slightly open or fully cinched shut depending on the design.
- Smooth First Round: It provides plenty of roomy access while you work your initial stitches, eliminating the frustration of cramming bulky stitches into tiny chain spaces.
What Will I Learn?
By following this step-by-step tutorial, you will master the foundational mechanics of the magic circle:
- How to wrap yarn around your fingers to create the signature crossed X anchor.
- How to position and rotate your crochet hook under the strands to form the initial working twist.
- How to draw yarn through the loop to establish a functioning, adjustable drawstring circle.
- How to mirror the exact same steps comfortably if you are a left-handed crocheter.
- How to work standard stitches (such as single crochet and double crochet) over both strands of the ring.
- How to pull the tail, close the center opening completely, and secure the end permanently against unraveling.
Materials and Tools
You can make a magic ring using any yarn fiber and any hook size that matches your project requirements. For practicing the technique, I recommend the following setup:
- Yarn: Medium worsted weight acrylic or smooth cotton yarn. A smooth, light-colored yarn with good twist makes it much easier to see the crossing strands on your fingers than dark or fuzzy novelty yarn.
- Crochet Hook: 5.0 mm (US H/8) crochet hook. An ergonomic hook with a smooth metal throat glides effortlessly under the loops.
- Tapestry Needle: A blunt metal yarn needle to weave the remaining tail securely into the back of your work.
- Scissors: For cutting yarn tails.
Right-Handed Magic Ring Step-by-Step
Follow these numbered steps slowly with your yarn in hand. Remember that speed comes with practice, so take your time on each motion.
Step 1: Wrap the Yarn to Form an X
Hold your non-dominant (left) hand out flat in front of you with your palm facing toward your chest:
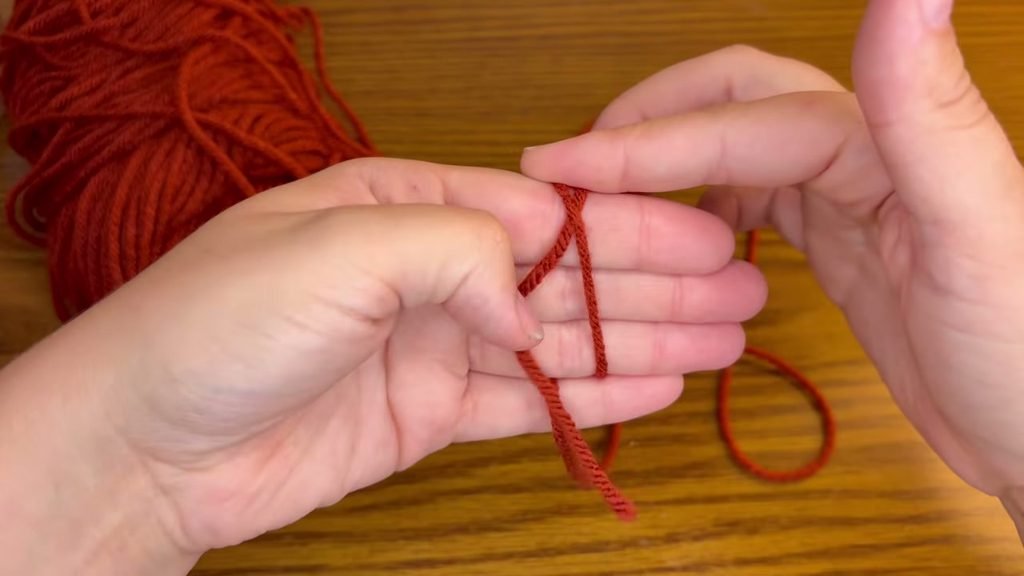
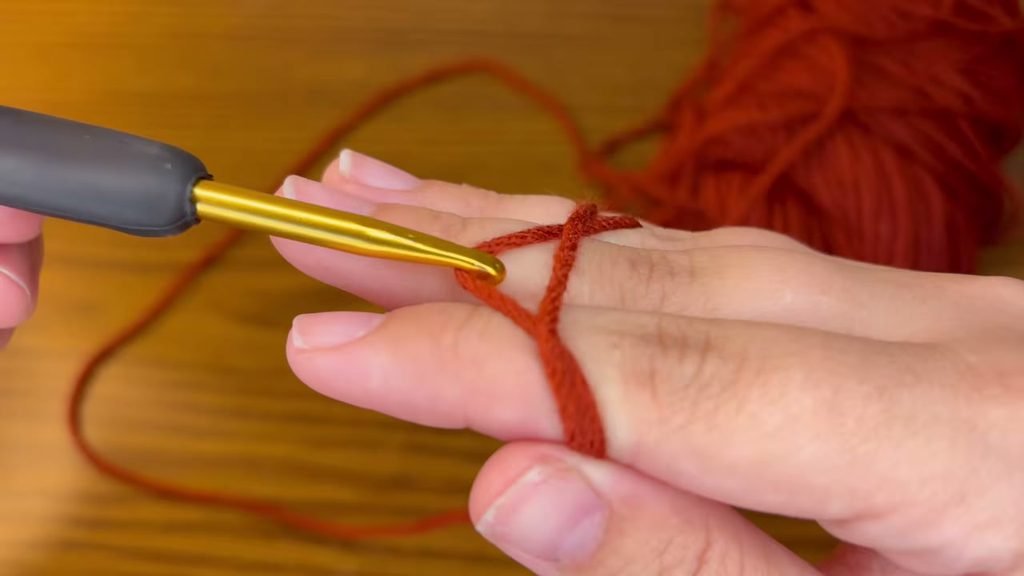
- Take the yarn tail in your right hand. Dangle the cut tail end downward across the front of your first three fingers (index, middle, and ring finger), leaving a 10 to 12 cm tail hanging toward your palm.
- Pinch the tail gently against the side of your index finger using your left thumb to hold it in place. Tuck the lower tail under your pinky finger for gentle tension.
- With your right hand, take the working yarn (the strand connected to the skein) and wrap it around the back of those three fingers, bringing it forward over the top of your fingers.
- Cross the working strand diagonally over the initial tail strand, forming a distinct X shape on the front of your fingers.
- Pinch the intersection of the X firmly with your thumb to hold both strands securely.
- Wrap the working yarn once more around the back of your fingers, creating two parallel horizontal bars across the back of your hand.
Step 2: Insert Hook and Twist
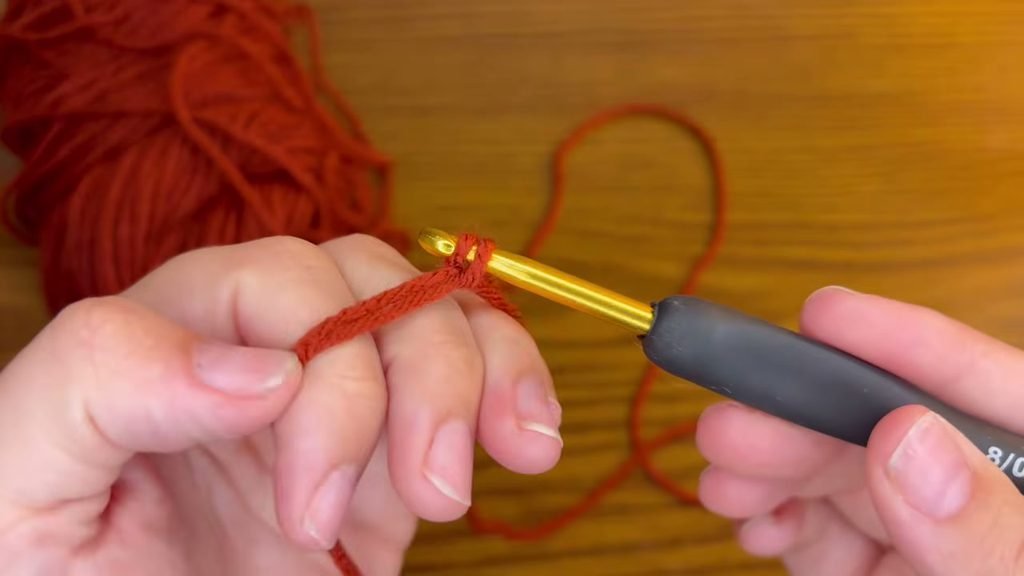
Hold your crochet hook in your right hand like a pencil or knife, ensuring the hook point is facing downwards:
- Slide your hook under the first (rightmost) strand of the X on your fingers.
- Catch the second (leftmost) strand of yarn with your hook point.
- Pull that second strand of yarn underneath the first strand toward the right.
- Rotate and twist the head of your crochet hook upward toward the ceiling. This twist locks the yarn on your hook into a small live loop.
Step 3: Yarn Over and Pull Through to Lock
Now you will create the locking chain that stabilizes the adjustable circle:
- Carefully reach over with your hook and catch the working yarn (the strand leading to the skein).
- Pull that strand directly through the loop that is currently on your hook.
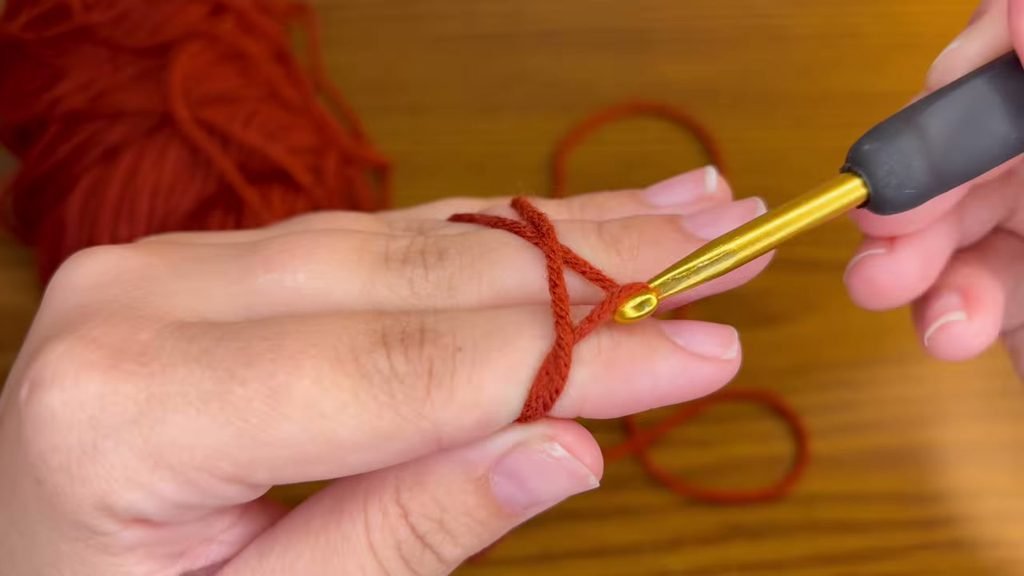
- Gently slide your fingers out of the big yarn ring, being careful not to let the loop pull apart.
- Hold the base of the loop between your thumb and middle finger. You now have a working loop on your hook and an adjustable large circle made of two parallel strands: the main circle and the cut yarn tail.
Step 4: The Adjustability Test
Before you crochet any stitches, perform a quick test: gently tug on the short yarn tail. The large circle should smoothly shrink in diameter. Loosen it back up with your fingers. If the loop glides easily when you pull the tail, your magic ring is correctly formed. If it locks into an immovable knot, unpick it and repeat Steps 1 through 3.
Left-Handed Magic Ring Step-by-Step
Crocheting with your left hand uses the exact same geometry mirrored across your right hand:
- Position Your Right Hand: Extend your right hand with fingers relaxed. Dangle the yarn tail downward across your first three fingers, holding the end steady with your right thumb and pinky.
- Form the Mirrored X: Bring the working yarn around the back of your three fingers and cross it diagonally over the front tail to create the X. Trap the crossing point with your right thumb.
- Hook Motion: Hold your hook in your left hand with the point directed down. Slide the hook under the first strand, catch the second strand, and pull it underneath. Rotate your hook tip upward to form the loop twist.
- Locking the Circle: Catch the working yarn with your left-handed hook and draw it through the loop. Slide your right fingers out of the circle, leaving a clean, adjustable drawstring ring.
How to Crochet Stitches into the Ring
Once your magic ring is formed, you work your required pattern stitches directly into the center of the large loop.
Crucial Golden Rule: Catch Both Strands
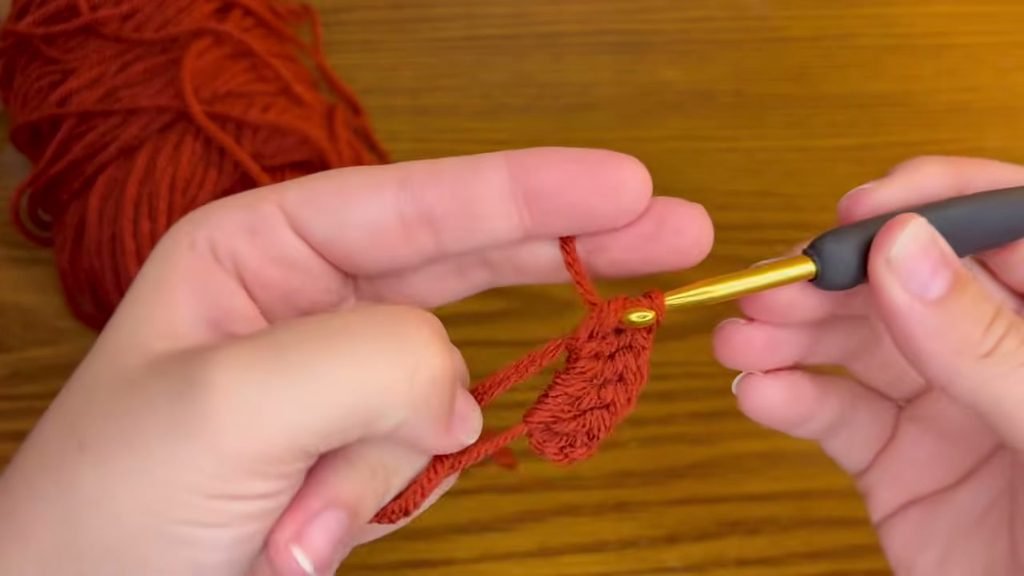
Whenever you insert your hook into the magic ring, you must insert it under both the ring strand and the short yarn tail together. The tail must be trapped inside the base of every single stitch around the circle. If your stitches only encircle one strand, the magic ring will fail to cinch shut when you pull the tail.
Working Single Crochet (sc)
Single crochet is standard for amigurumi and tight circular projects:
- The initial locking loop on your hook does not count as a stitch. For single crochet, you can chain 1 or work directly into the ring.
- Insert your hook through the center of the ring, catching both the circle strand and the tail.
- Yarn over and pull up a loop through the ring (2 loops on hook).
- Yarn over and pull through both loops on your hook. Your first single crochet is complete.
- Repeat for the required number of stitches (typically 6 sc for amigurumi).
Working Double Crochet (dc)
Double crochet is common for granny squares, mandalas, and hats:
- Chain 2 or 3 to reach double crochet height. Note that the initial locking chain made during the magic ring setup is not counted as one of your turning chains.
- Yarn over, insert hook through the center of the ring under both strands, yarn over and pull up a loop (3 loops on hook).
- Yarn over and pull through 2 loops (2 loops on hook).
- Yarn over and pull through the remaining 2 loops.
- Repeat until you have the required stitch count (typically 12 dc for round flat circles).
How to Close and Secure the Magic Ring
Closing the ring is the most satisfying step in the entire process:
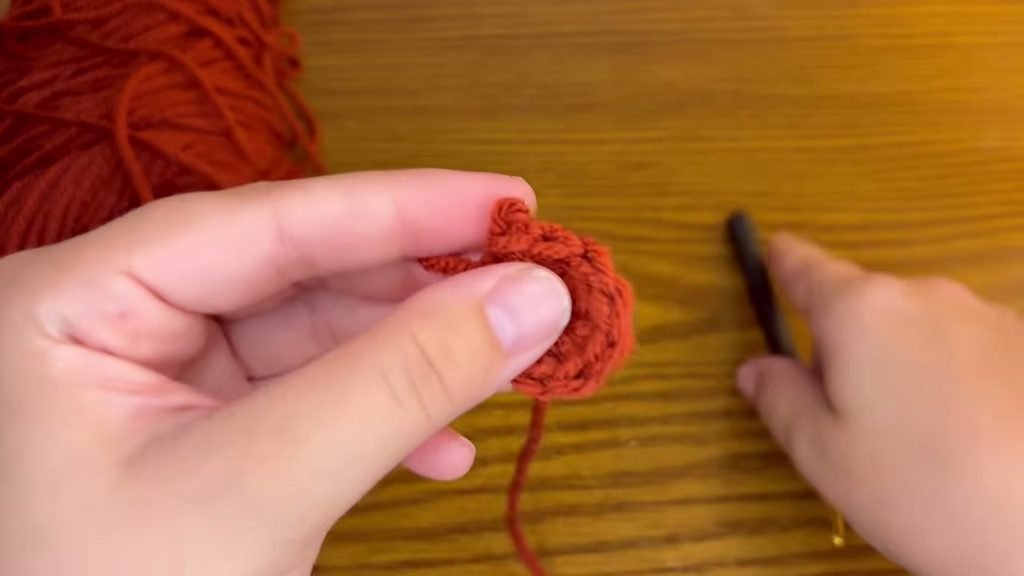
- Hold the body of your crocheted stitches gently between your thumb and fingers.
- Take the short yarn tail in your other hand and pull it firmly and steadily. Watch as the stitches slide along the drawstring, drawing together until the center hole completely disappears.
- Insert your hook into the top of the very first stitch of the round and work a slip stitch to join the circle into a complete wheel.
- Give the yarn tail one final firm tug to ensure the center hole is closed as tightly as possible.
How to Lock the Tail Permanently
A magic ring is an adjustable loop, which means without proper securing, gentle washing or stretching can cause the center hole to open back up. To make your magic ring permanent and machine-wash safe:
- Thread the short yarn tail onto a blunt tapestry needle.
- Turn your work to the wrong (back) side.
- Weave the needle through the dense base of the stitches around the center circle in one direction for about half the circumference.
- Reverse your direction, skip a tiny fiber to prevent pulling the thread back out, and weave in the opposite direction through the same base stitches.
- Weave in a third direction or split a yarn ply with your needle, pull snug, and snip the excess tail close to the fabric. Three passes in alternating directions will lock the drawstring permanently.
Magic Ring vs Chain-2 Method
| Feature | Magic Ring (Magic Circle) | Chain-2 Method (Chain and Join) |
|---|---|---|
| Center Hole | Completely closed with 0 mm gap | Small permanent gap in center (2 mm to 4 mm) |
| Adjustability | Fully adjustable drawstring | Fixed diameter; cannot be tightened after working |
| Best Projects | Amigurumi plushies, beanies, solid coasters | Lacy granny squares, projects where a small center hole is desired |
| Learning Curve | Moderate (requires finger wrapping practice) | Very easy (simple chain stitches only) |
| Security | Requires thorough 3-pass weaving to lock tail | Naturally secure because stitches enter a locked chain |
Video Tutorial
Watch both right-handed and left-handed demonstrations in clear, slow motion in the video tutorial: How to Crochet a Magic Ring for Beginners | Easy Step-by-Step Tutorial by Heritage Charm Crochet.
Tips and Common Mistakes
- Leaving Too Short of a Tail: If your initial yarn tail is only 3 or 4 cm long, you will struggle to cinch the ring closed and will not have enough length left to weave in securely with a tapestry needle. Always leave a generous 10 to 12 cm tail.
- Stitches Bunching Up: If your stitches feel cramped as you work into the ring, gently pull the circle open wider with your fingers. The ring is completely adjustable while you are working into it.
- Ring Will Not Close: If you pull the tail and the circle refuses to budge, one of two things happened: either you accidentally split a strand of yarn with your hook point while working stitches, or you did not crochet over both strands. Ensure your hook always clears both yarn strands cleanly.
- Chenille or Velvet Yarn Snapping: Fluffy blanket and chenille yarns have delicate polyester fuzz on a thin thread core. Pulling the tail hard on chenille yarn can strip the fuzz or snap the core. For chenille yarn, cinch the ring halfway closed after 3 stitches, then finish the remaining stitches and pull gently.
- Do Not Count the Locking Loop as a Chain: When a pattern calls for chaining 3 for your first double crochet, do not count the initial locking chain made to secure the magic ring as one of those chains. Work your full chain count so your first stitch reaches proper height.
Make More / Related Patterns
Now that you have mastered the magic ring, put your new skill to work with these free circular patterns:
- crochet baby blanket –> https://cozyknotty.com/crochet-baby-blanket/
- Crochet flower peony –> https://cozyknotty.com/crochet-flower/
- Crochet pumpkin –> https://cozyknotty.com/crochet-pumpkin/
Frequently Asked Questions
Is a magic ring and a magic circle the same thing?
Yes, magic ring, magic circle, and adjustable loop are different names for the exact same crochet technique. Different designers and pattern publishers use these terms interchangeably.
Can my magic ring unravel in the washing machine?
The magic ring will only unravel if the tail is simply cut short without being woven in. Because the center is an adjustable slip knot, you must weave the tail back and forth in three alternating directions through the base of the stitches with a tapestry needle to anchor it permanently.
What if I cannot get the hang of the magic ring?
If you find the finger wrapping challenging, you can use the chain-2 alternative: chain 2, then work all of your first-round stitches directly into the first chain from your hook. While this leaves a tiny gap, it is a practical alternative while you build your crochet confidence.
Why does my circle ruffle or bowl when I keep crocheting?
Ruffling or bowling is caused by your stitch increase rate in subsequent rounds, not the magic ring itself. In general crochet math, a flat single crochet circle requires 6 increases per round, a half double crochet circle requires 8 to 10 increases per round, and a double crochet circle requires 12 increases per round.
I would love to hear how your magic ring turned out, so please leave a comment below if you have any questions or tell me what circular project you are starting next. Happy crocheting, Sara!
One reply on “Crochet magic ring”
[…] Crochet magic ring –> https://cozyknotty.com/crochet-magic-ring/ […]