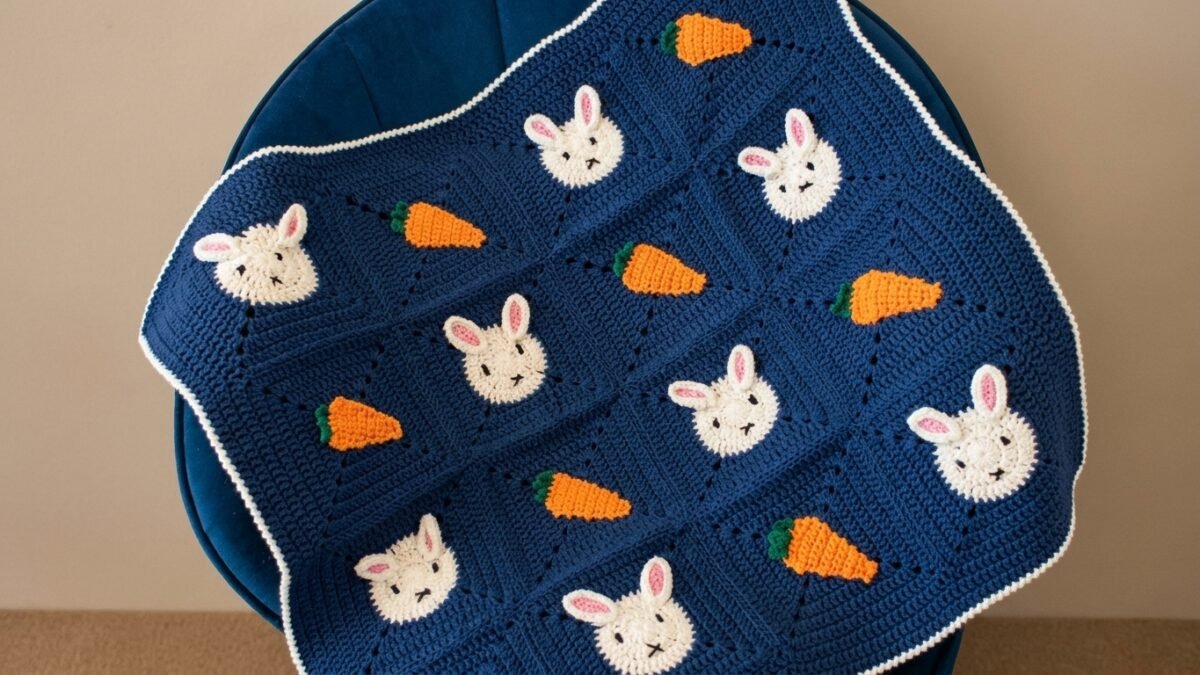
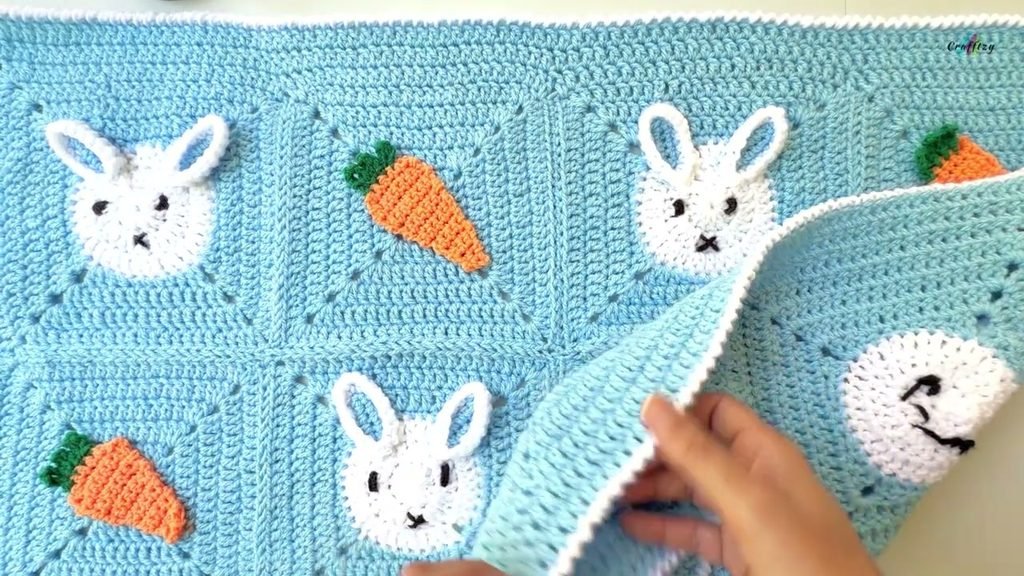
Welcome to this step-by-step tutorial for my crochet rabbit and carrot granny square blanket. If you are searching for adorable, tactile crochet newborn blanket patterns, this pastel nursery project pairs 3D elements with clean geometric construction. Featuring sweet bunny faces with pop-up ears and bright orange carrot appliqués placed across a soft sky-blue checkerboard, this design is framed with four rounds of solid double crochet and finished with a crisp white corded crab stitch border.
The completed blanket measures 31 by 31 inches (79 by 79 cm), making it an ideal size for newborn cribs, car seat covers, tummy time, or photography props. Among versatile crochet newborn blanket patterns, this complete guide includes row-by-row instructions for the solid granny squares, crocheted carrots, rabbit face squares, dimensional ears, facial embroidery, invisible joining, and the multi-round border.
This post is based on the video tutorial by Crafftzy, linked below.
Table of Contents
What Will I Learn?
In this project, you will practice converting circular motifs into flat squares, crafting dimensional appliqués, and working a reverse single crochet border. Like many popular crochet newborn blanket patterns, you will also learn how matching edge stitch counts makes sewing granny squares smooth and symmetrical.
Here are the specific skills covered in this tutorial:
- Crocheting solid double crochet granny squares with neat two-chain corners
- Shaping tapered flat carrot appliqués using single crochet increases and decreases
- Creating multi-stem green carrot tops using simple chain clusters
- Squaring a circular circle motif using graduated stitch heights (single, half double, and double crochets)
- Crafting cupped 3D animal ears that naturally curve outward from the fabric
- Embroidering neat, expressive facial features onto crochet stitches
- Joining squares invisibly using back loop whipstitching
- Working corner decreases (dc2tog) at panel seams to keep borders flat
- Crocheting a corded rope-like border using the crab stitch (reverse single crochet)
Materials and Tools
- Yarn: Double Knit (DK / light worsted / 8-ply) acrylic or cotton-blend yarn in four shades:
- Light Blue (main background, rabbit square borders, and border rounds 1 to 4): approximately 350 grams (875 meters / 955 yards)
- White (rabbit face discs, outer ear borders, and crab stitch edging): approximately 150 grams (375 meters / 410 yards)
- Orange (carrot appliqués): approximately 50 grams (125 meters / 135 yards)
- Green (carrot leafy tops): approximately 20 grams (50 meters / 55 yards)
- Black or Charcoal (small scrap length for embroidering eyes and mouth)
- Crochet Hooks:
- 5.0 mm (US size H/8) crochet hook for all granny squares, rabbit framing, and blanket border rounds
- 4.5 mm (US size 7) crochet hook for the carrot appliqués and rabbit ears to maintain tight, neat tension
- Tapestry / Darning Needle: A blunt yarn needle for sewing appliqués, joining squares, and weaving in tails.
- Scissors: Sharp craft scissors.
- Locking Stitch Markers: Helpful for pinning carrots in place and marking corner chains during assembly.
- Tape Measure: For checking square size and blanket dimensions.
Yarn Substitution: You can substitute any premium DK or light worsted weight yarn, such as Paintbox Yarns Simply DK, Stylecraft Special DK, or Bernat Softee Baby. If you are crafting crochet newborn blanket patterns for everyday nursery use, a light worsted cotton-bamboo blend offers soft drape and easy machine washability.
Sizing and Blanket Layout
- Finished Blanket Size: 31 by 31 inches (79 by 79 cm) including the outer borders.
- Individual Square Size: 7 by 7 inches (18 by 18 cm) per blocked square.
- Total Squares: 16 squares total (8 Carrot Squares and 8 Rabbit Squares).
- Blanket Grid: Arranged in a 4 by 4 checkerboard grid:
- Row 1: Rabbit Square, Carrot Square, Rabbit Square, Carrot Square
- Row 2: Carrot Square, Rabbit Square, Carrot Square, Rabbit Square
- Row 3: Rabbit Square, Carrot Square, Rabbit Square, Carrot Square
- Row 4: Carrot Square, Rabbit Square, Carrot Square, Rabbit Square
Pattern Notes
- Crochet Terminology: All instructions use standard US crochet terms and US spellings.
- Turning Chains: In double crochet rounds, the beginning chain 3 counts as the first double crochet throughout. In single crochet rows, beginning chain 1 does not count as a stitch.
- Matching Stitch Counts: Both the Solid Granny Square (at Round 6) and the Rabbit Granny Square (at Round 7) end with exactly 23 double crochets on each side between the corner chain-2 spaces. This 1-to-1 match ensures the squares align without stretching during assembly.
- Invisible Seams: Squares are sewn together through the back loops only with a darning needle, creating a flat, flexible seam that looks virtually invisible on the right side.
Abbreviations and Stitch Glossary
- ch: chain
- st / sts: stitch / stitches
- sl st: slip stitch
- sc: single crochet
- hdc: half double crochet
- dc: double crochet
- dc2tog: double crochet two stitches together (decrease across seam corners)
- sc dec: single crochet decrease (insert hook in next st, yo, pull up loop, insert in following st, yo, pull up loop, yo, pull through all 3 loops)
- MR: magic ring
- sp / sps: space / spaces
- BLO: back loop only
- Crab Stitch (Reverse Single Crochet): Working from left to right (reverse direction of normal crochet), insert hook into the previous stitch to the right, yarn over, pull up a loop (twist hook slightly), yarn over and draw through both loops on the hook.
- ( … )* repeat: Repeat the sequence enclosed in brackets as specified.
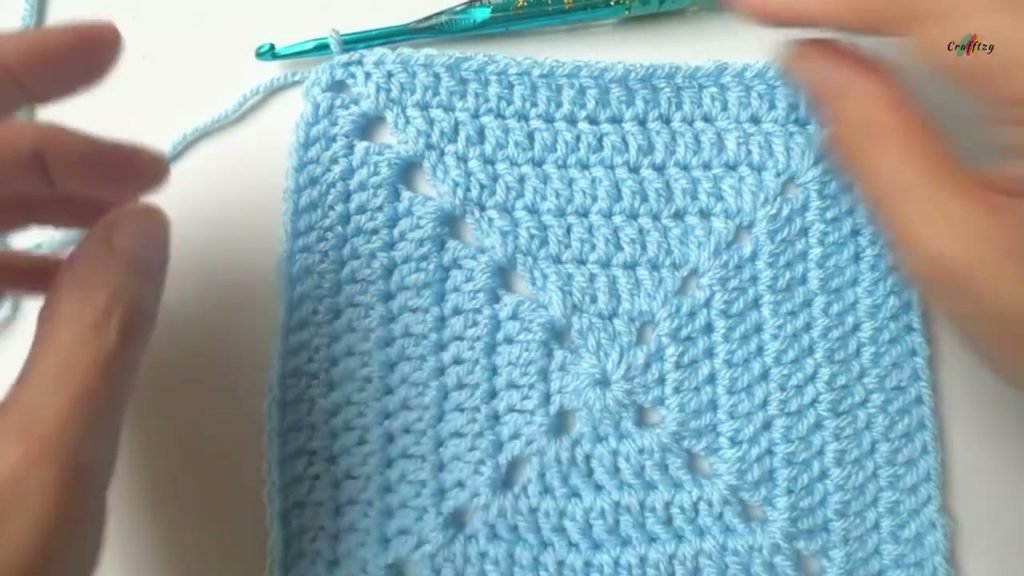
Solid Granny Square (Carrot Background)
Make 8 solid squares in Light Blue using the 5.0 mm hook.
Round 1
Start with a magic ring (or chain 4 and slip stitch into the first chain to form a small ring). Chain 3 (counts as first dc), chain 2 (first corner space). Into the ring, work: 3 double crochets, chain 2 (second corner), 3 double crochets, chain 2 (third corner), 3 double crochets, chain 2 (fourth corner), then work 2 double crochets. Join with a slip stitch into the third chain of the beginning chain 3. (12 dc total, with 3 dc on each side, plus 4 corner ch-2 spaces)
Round 2
Slip stitch into the corner chain-2 space. Chain 3 (counts as first dc), chain 2 (corner space), then work 2 double crochets into the same corner space. Work 1 double crochet into each of the next 3 double crochets along the side. Into the next corner chain-2 space, work: (2 double crochets, chain 2, 2 double crochets). Repeat this sequence around: work 1 double crochet in each stitch along the side and (2 dc, ch 2, 2 dc) in each corner space. On the final side, work 1 double crochet in each of the 3 side stitches, then work 1 double crochet into the starting corner space to complete the initial corner group. Join with a slip stitch into the third chain of the beginning chain 3. (28 dc total, with 7 dc on each side)
Round 3
Slip stitch into the corner chain-2 space. Chain 3 (counts as 1 dc), chain 2, 2 double crochets into the same corner space. Work 1 double crochet into each of the 7 double crochets along the side. Work (2 dc, ch 2, 2 dc) into the next corner space. Repeat around: 1 double crochet in each side stitch, and (2 dc, ch 2, 2 dc) in each corner space. At the end of the round, work 1 double crochet into the starting corner space, and join with a slip stitch to the third chain of the beginning chain 3. (44 dc total, with 11 dc on each side)
Round 4
Repeat the corner and side pattern: Work 1 double crochet in each of the 11 side stitches, and (2 dc, ch 2, 2 dc) in each corner space. End with 1 double crochet in the starting corner, and join with a slip stitch into the third chain of the beginning chain 3. (60 dc total, with 15 dc on each side)
Round 5
Repeat the corner and side pattern: Work 1 double crochet in each of the 15 side stitches, and (2 dc, ch 2, 2 dc) in each corner space. End with 1 double crochet in the starting corner, and join with a slip stitch into the third chain of the beginning chain 3. (76 dc total, with 19 dc on each side)
Round 6
Repeat the corner and side pattern: Work 1 double crochet in each of the 19 side stitches, and (2 dc, ch 2, 2 dc) in each corner space. End with 1 double crochet in the starting corner, and join with a slip stitch into the third chain of the beginning chain 3. (92 dc total, with 23 dc on each side)
Fasten off Light Blue yarn leaving an 8-inch tail. Weave in the starting center tail and the ending corner tail on the wrong side. Repeat to make 8 solid blue squares.
Crochet Carrot Appliqué and Leaves
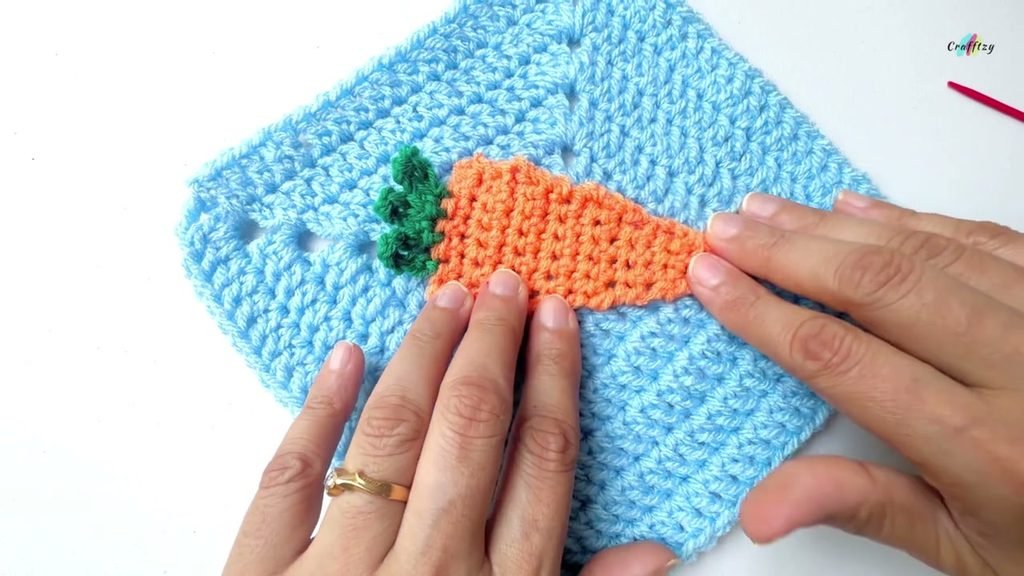
Make 8 carrots in Orange and Green using the 4.5 mm hook.
Carrot Body (Orange Yarn)
- Row 1: Chain 3. Single crochet into the second chain from the hook and into the next chain. (2 sc).
- Row 2: Chain 1, turn. Work 1 single crochet in each of the 2 stitches. (2 sc).
- Row 3: Chain 1, turn. Work 2 single crochets in each stitch. (4 sc).
- Rows 4–6 (3 rows): Chain 1, turn. Work 1 single crochet in each of the 4 stitches. (4 sc per row).
- Row 7: Chain 1, turn. Work 2 single crochets in the first stitch, 1 single crochet in each of the next 2 stitches, 2 single crochets in the last stitch. (6 sc).
- Rows 8–10 (3 rows): Chain 1, turn. Work 1 single crochet in each of the 6 stitches. (6 sc per row).
- Row 11: Chain 1, turn. Work 2 single crochets in the first stitch, 1 single crochet in each of the next 4 stitches, 2 single crochets in the last stitch. (8 sc).
- Rows 12–13 (2 rows): Chain 1, turn. Work 1 single crochet in each of the 8 stitches. (8 sc per row).
- Row 14: Chain 1, turn. Work a single crochet decrease over the first 2 stitches, 1 single crochet in each of the next 4 stitches, single crochet decrease over the last 2 stitches. (6 sc).
- Row 15: Chain 1, turn. Work 1 single crochet in each of the 6 stitches across. (6 sc). Fasten off Orange yarn leaving a 16-inch tail for sewing.
Carrot Leaves (Green Yarn)
Join Green yarn with a slip stitch to the top right corner of Row 15 of the carrot.
- Frond 1: Chain 8. Slip stitch into the second stitch across Row 15.
- Frond 2: Chain 8. Slip stitch into the fourth stitch across Row 15.
- Frond 3: Chain 8. Slip stitch into the final stitch at the top left corner of Row 15. Chain 1, cut Green yarn leaving an 8-inch tail, and pull through to secure.
Sewing Carrot to Granny Square
Lay one Solid Blue Granny Square flat with the right side facing up. Position the carrot diagonally across the square, pointing from the lower corner toward the opposite upper corner. Thread the long orange yarn tail onto your tapestry needle. Using neat small whipstitches, sew along the perimeter of the carrot body, catching only the top fibers of the blue square so stitches do not show on the back. Use the green tail to tack down the base of each chain-8 leafy frond. Weave in tails securely on the wrong side. Repeat for all 8 carrot squares.
Rabbit Granny Square
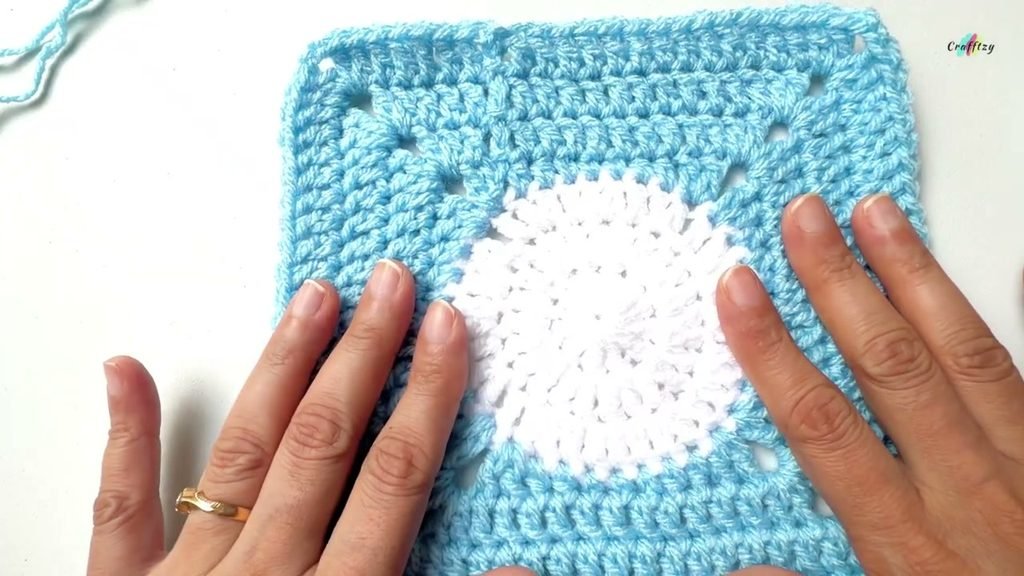
Make 8 rabbit squares with White center discs and Light Blue outer framing using the 5.0 mm hook.
Round 1 (White Yarn – Center Face Disc)
In a magic ring, chain 3 (counts as 1 dc). Work 11 double crochets into the ring. Pull the center ring tail firmly to close the hole. Join with a slip stitch to the third chain of the beginning chain 3. (12 dc)
Round 2 (White Yarn)
Chain 3 (counts as 1 dc), work 1 double crochet into the same stitch at the base of the chain. Work 2 double crochets into each double crochet stitch around. Join with a slip stitch into the third chain of the beginning chain 3. (24 dc)
Round 3 (White Yarn)
Chain 3 (counts as 1 dc), work 1 double crochet into the same stitch. Work 1 double crochet into the next stitch. Repeat around: (2 double crochets in the next stitch, 1 double crochet in the following stitch). Join with a slip stitch into the third chain of the beginning chain 3. (36 dc)
Cut White yarn leaving a 4-inch tail and fasten off. Weave the starting and ending white tails into the back of the circle.
Round 4 (Light Blue Yarn – Squaring the Circle)
Join Light Blue yarn with a slip stitch into any single double crochet stitch of Round 3. Chain 3 (counts as 1 dc), work 1 double crochet into the same stitch. Chain 2 for the corner. Work 2 double crochets into the very next stitch of Round 3. Work across the first side:
- 1 half double crochet in each of the next 2 stitches
- 1 single crochet in each of the next 3 stitches
- 1 half double crochet in each of the next 2 stitches Into the next stitch, work 2 double crochets, chain 2 (corner space), then work 2 double crochets into the following stitch. Repeat this sequence for all four sides: [2 hdc, 3 sc, 2 hdc along the side; corner split over 2 stitches with (2 dc), ch 2, (2 dc)]. After the final 2 half double crochets on the fourth side, join with a slip stitch into the third chain of the beginning chain 3. (44 stitches total, with 11 stitches per side, plus 4 corner ch-2 spaces)
Round 5 (Light Blue Yarn)
Slip stitch into the corner chain-2 space. Chain 3 (counts as 1 dc), chain 2, 2 double crochets into the same corner space. Work 1 double crochet into each of the 11 stitches along the side. Work (2 dc, ch 2, 2 dc) into the next corner space. Repeat around, working 1 double crochet in each side stitch and (2 dc, ch 2, 2 dc) in each corner. End with 1 double crochet into the starting corner space, and join with a slip stitch to the third chain of the beginning chain 3. (60 dc total, with 15 dc on each side)
Round 6 (Light Blue Yarn)
Slip stitch into the corner space. Chain 3 (counts as 1 dc), chain 2, 2 double crochets into the same corner space. Work 1 double crochet into each of the 15 stitches along the side. Work (2 dc, ch 2, 2 dc) into each corner space. Repeat around. End with 1 double crochet into the starting corner, and join with a slip stitch into the third chain of the beginning chain 3. (76 dc total, with 19 dc on each side)
Round 7 (Light Blue Yarn)
Slip stitch into the corner space. Chain 3 (counts as 1 dc), chain 2, 2 double crochets into the same corner space. Work 1 double crochet into each of the 19 stitches along the side. Work (2 dc, ch 2, 2 dc) into each corner space. Repeat around. End with 1 double crochet into the starting corner, and join with a slip stitch into the third chain of the beginning chain 3. (92 dc total, with 23 dc on each side)
Fasten off Light Blue yarn leaving an 8-inch tail. Weave in ends. Repeat to complete 8 framed rabbit squares.
3D Rabbit Ears and Facial Embroidery
Make 16 ears total (2 ears per rabbit square) using the 4.5 mm hook.
Ear Center Strip (Light Blue Yarn)
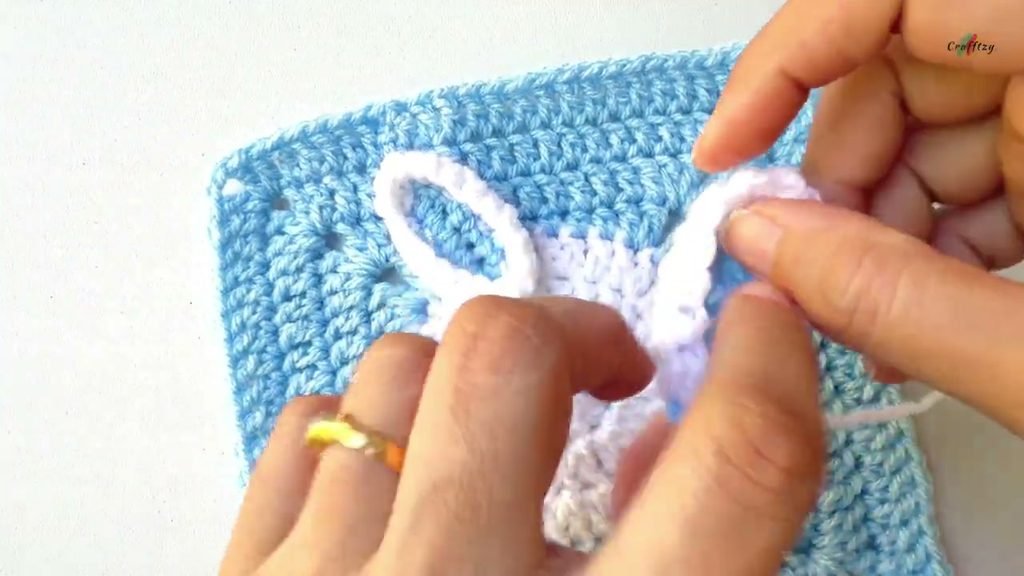
Chain 7. Starting in the second chain from the hook, work 1 single crochet in each of the 6 chains down the foundation row. (6 sc). Turn your work to crochet into the opposite unworked loops of the foundation chain: work 1 single crochet in each of the 6 loops back to the start. (6 sc, 12 sc total). Fasten off Light Blue yarn.
Outer Ear Border (White Yarn)
Join White yarn with a slip stitch into the first single crochet. Chain 1.
- Round 1: Work 1 single crochet in each of the first 5 stitches. Work 2 single crochets in each of the next 2 stitches at the rounded top tip. Work 1 single crochet in each of the remaining 5 stitches. Skip the joining slip stitch, and join with a slip stitch to the first single crochet. (14 sc).
- Round 2: Work 1 single crochet in each of the first 6 stitches. Work 2 single crochets in each of the next 2 tip stitches. Work 1 single crochet in each of the remaining 6 stitches. (16 sc). Join with a slip stitch to the first single crochet. Cut White yarn leaving a 12-inch tail for sewing, and pull through. The ear will naturally cup inward into a dimensional curve.
Attaching Ears and Embroidering Face
- Sewing Ears: Position two ears at the upper portion of the white circular face (anchored around Round 3), angled slightly outward. Using the white yarn tail and your tapestry needle, securely stitch the bottom base of each ear to the white circle. Keep the tips free so they stand up from the blanket surface.
- Embroidering Eyes: Thread black or charcoal yarn onto your needle. Work two small vertical or sleepy curved stitches on Round 2 of the white circle, spaced about 4 stitches apart on either side of the center.
- Embroidering Nose and Mouth: Using black (or soft pink) yarn, stitch a small “Y” shape in the lower center between the eyes: work a horizontal bar or tiny “V” for the nose and a downward stitch for the bunny mouth. Knot and hide yarn tails on the reverse side.
Blanket Assembly and Invisible Joining
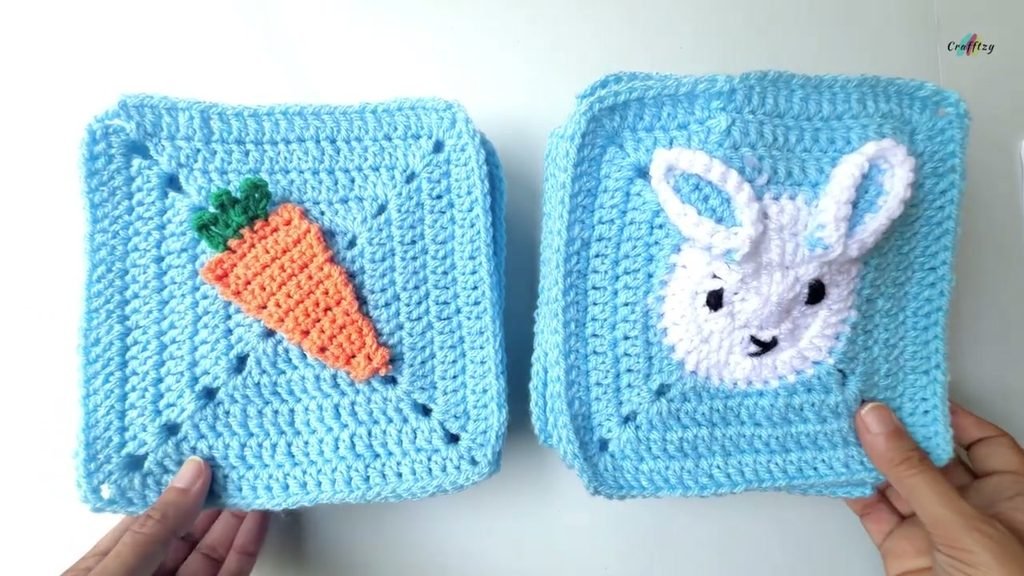
Once all 16 squares are finished (8 Carrot Squares and 8 Rabbit Squares), arrange them in a 4 by 4 alternating checkerboard grid on a flat surface.
Invisible Back Loop Seaming
Thread a long strand of Light Blue yarn onto your tapestry needle.
- Place two adjacent squares with right sides facing up.
- Align the stitches along the shared edge, matching stitch-for-stitch from the corner chain-2 spaces to the opposite corner.
- Insert your needle through the back loop only of the corner chain on the first square, then through the back loop only of the corresponding corner chain on the second square.
- Draw the yarn through, leaving a 4-inch tail to weave in later.
- Continue whipstitching across the edge, picking up only the inner back loops of both squares. Draw the yarn snug so the seam sits flat between the squares without puckering.
- Join all vertical rows first, then join all horizontal rows. Weave in all joining tails on the wrong side.
Five-Round Blanket Border
Work the border around the assembled 16-square blanket using the 5.0 mm hook.
Border Round 1 (Light Blue Yarn)
Join Light Blue yarn with a slip stitch into any outer corner chain-2 space of the blanket. Chain 3 (counts as 1 dc), chain 2 (corner space), then work 2 double crochets into the same corner space. Work along the edge:
- Work 1 double crochet into each double crochet across the first square until reaching the corner space before the seam.
- Seam Join Decrease (dc2tog): To keep the border completely flat across the joined squares, yarn over, insert hook into the corner chain-2 space of the current square, yarn over and pull up a loop, yarn over and draw through 2 loops (2 loops remain on hook). Yarn over, insert hook into the corner chain-2 space of the next square, yarn over and pull up a loop, yarn over and draw through 2 loops (3 loops on hook). Yarn over and draw through all 3 loops.
- Continue working 1 double crochet in each stitch along the next square, working a dc2tog across every seam.
- Into each of the four outer corners of the blanket, work: (2 double crochets, chain 2, 2 double crochets). At the end of the round, work 1 double crochet into the starting corner space, and join with a slip stitch to the third chain of the beginning chain 3.
Border Rounds 2–4 (Light Blue Yarn)
Slip stitch into the corner space. Chain 3 (counts as 1 dc), chain 2, 2 double crochets into the same corner space. Work 1 double crochet in every double crochet stitch around the blanket (treating the dc2tog from Round 1 as a normal stitch). In each outer corner space, work: (2 double crochets, chain 2, 2 double crochets). End each round with 1 double crochet into the starting corner space, and join with a slip stitch into the third chain of the beginning chain 3. At the end of Round 4, fasten off Light Blue yarn and weave in ends.
Border Round 5 (White Yarn – Crab Stitch Edging)
Join White yarn with a slip stitch into any corner space of the blanket. Work the crab stitch (reverse single crochet) from left to right around the entire perimeter:
- Insert hook into the stitch immediately to the right of your hook.
- Yarn over and pull up a loop, twisting the hook slightly to allow the loop through comfortably.
- Yarn over and draw through both loops on the hook.
- Continue working 1 reverse single crochet into every stitch along each side and into each corner space. When you return to the starting corner, work a final reverse single crochet, cut White yarn leaving a 6-inch tail, pull through, and use your tapestry needle to invisibly join to the beginning stitch. Weave in all remaining tails neatly on the back of the blanket.
Video Tutorial
Follow along with the complete step by step video walkthrough below to watch every round, appliqué assembly, ear construction, and border technique in action:
Tips and Common Mistakes
- Count your side stitches: Before sewing your blanket together, verify that every square has 23 double crochets per side. A quick count prevents wavy or puckered seams during assembly.
- Do not pull seams too tight: When whipstitching back loops together, maintain a relaxed, uniform tension so the blanket lies completely flat when unfolded.
- Seam decreases on the border: Working a dc2tog across the corner spaces where two squares meet eliminates excess fullness and keeps the blanket edges straight and square.
- Relax your crab stitch tension: The reverse single crochet can pull tight if your working loops are small. Lift your loop slightly higher as you pull through so the corded border rolls smoothly along the edge.
Make More: Crochet Newborn Blanket Patterns
- Crochet Witch Hat with flowers —> https://cozyknotty.com/crochet-witch-hat-with-flowers-adult-size/
- crochet baby blanket —> https://cozyknotty.com/crochet-baby-blanket/
Frequently Asked Questions
Can I make this blanket larger for a twin bed or toddler bed?
Yes, while designed as one of our favorite crochet newborn blanket patterns, you can easily expand this project by crocheting additional squares. Making a 5 by 5 grid (25 squares) or a 6 by 6 grid (36 squares) creates a generous child-sized bed throw while using the exact same assembly and border techniques.
Why do the bunny ears curl inward?
The increase placement on Rounds 1 and 2 of the white ear border causes the edge stitches to pull slightly inward. This creates an intentional cupped 3D effect that allows the ears to stand up from the blanket surface.
Can I machine wash this blanket?
Yes, blankets made with quality acrylic or cotton DK yarns can be washed on a gentle cold cycle inside a mesh laundry bag. Lay the blanket flat on clean towels to air dry to keep the 3D ears and carrot appliqués in crisp shape.
Is the crab stitch difficult for beginners?
While working backwards from left to right feels unusual at first, the crab stitch uses the exact same movements as a normal single crochet. Once you find your rhythm and keep your loops relaxed, it quickly becomes one of the most rewarding decorative borders in crochet newborn blanket patterns.
I would love to see your finished nursery blanket and adorable bunnies, so please share your makes and questions in the comments below. Happy crocheting, Meryem!
4 replies on “Crochet Newborn Blanket Patterns: Rabbit Granny Square Blanket”
[…] Crochet Newborn Blanket —> https://cozyknotty.com/crochet-newborn-blanket/ […]
[…] Crochet Newborn Blanket –> https://cozyknotty.com/crochet-newborn-blanket/ […]
[…] Crochet Newborn Blanket –> https://cozyknotty.com/crochet-newborn-blanket/ […]
[…] Crochet Newborn Blanket –> https://cozyknotty.com/crochet-newborn-blanket/ […]